Gray Oak Gives Back - Fireplace Transformation

A big, juicy post with all the details of our Gray Oak Gives Back transformation is coming soon. But first we want to dive into the fireplace transformation because this transformation was in and of itself MAJOR. And because so many fellow New Englanders with 1940s/1950s houses have this exact fireplace and have reached out to us asking for the play-by-play.

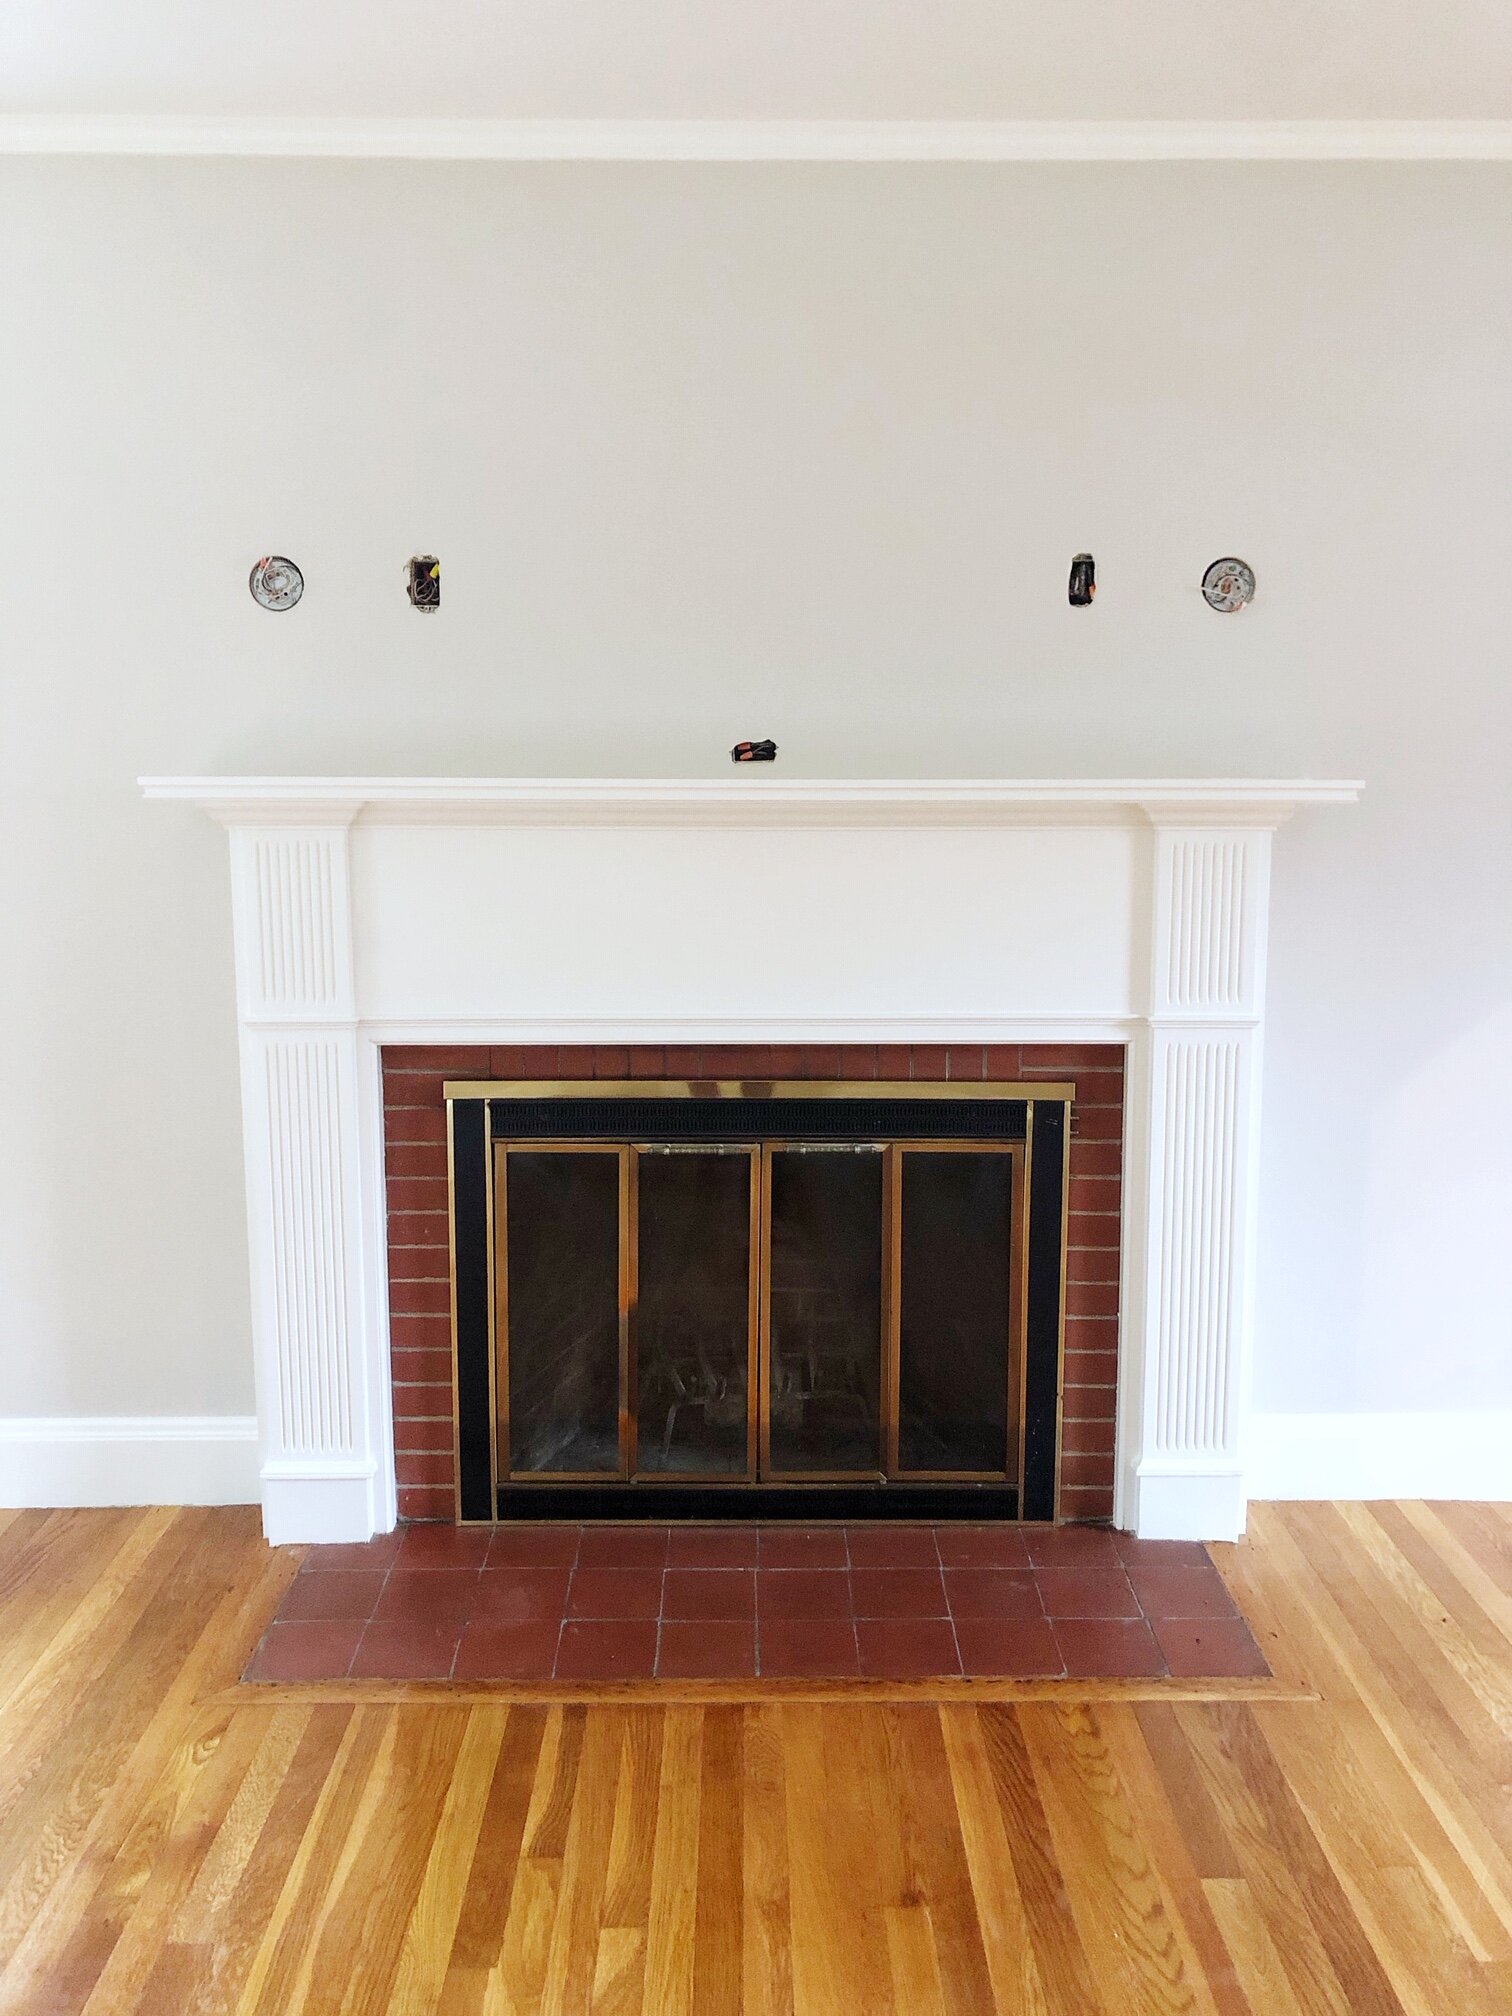
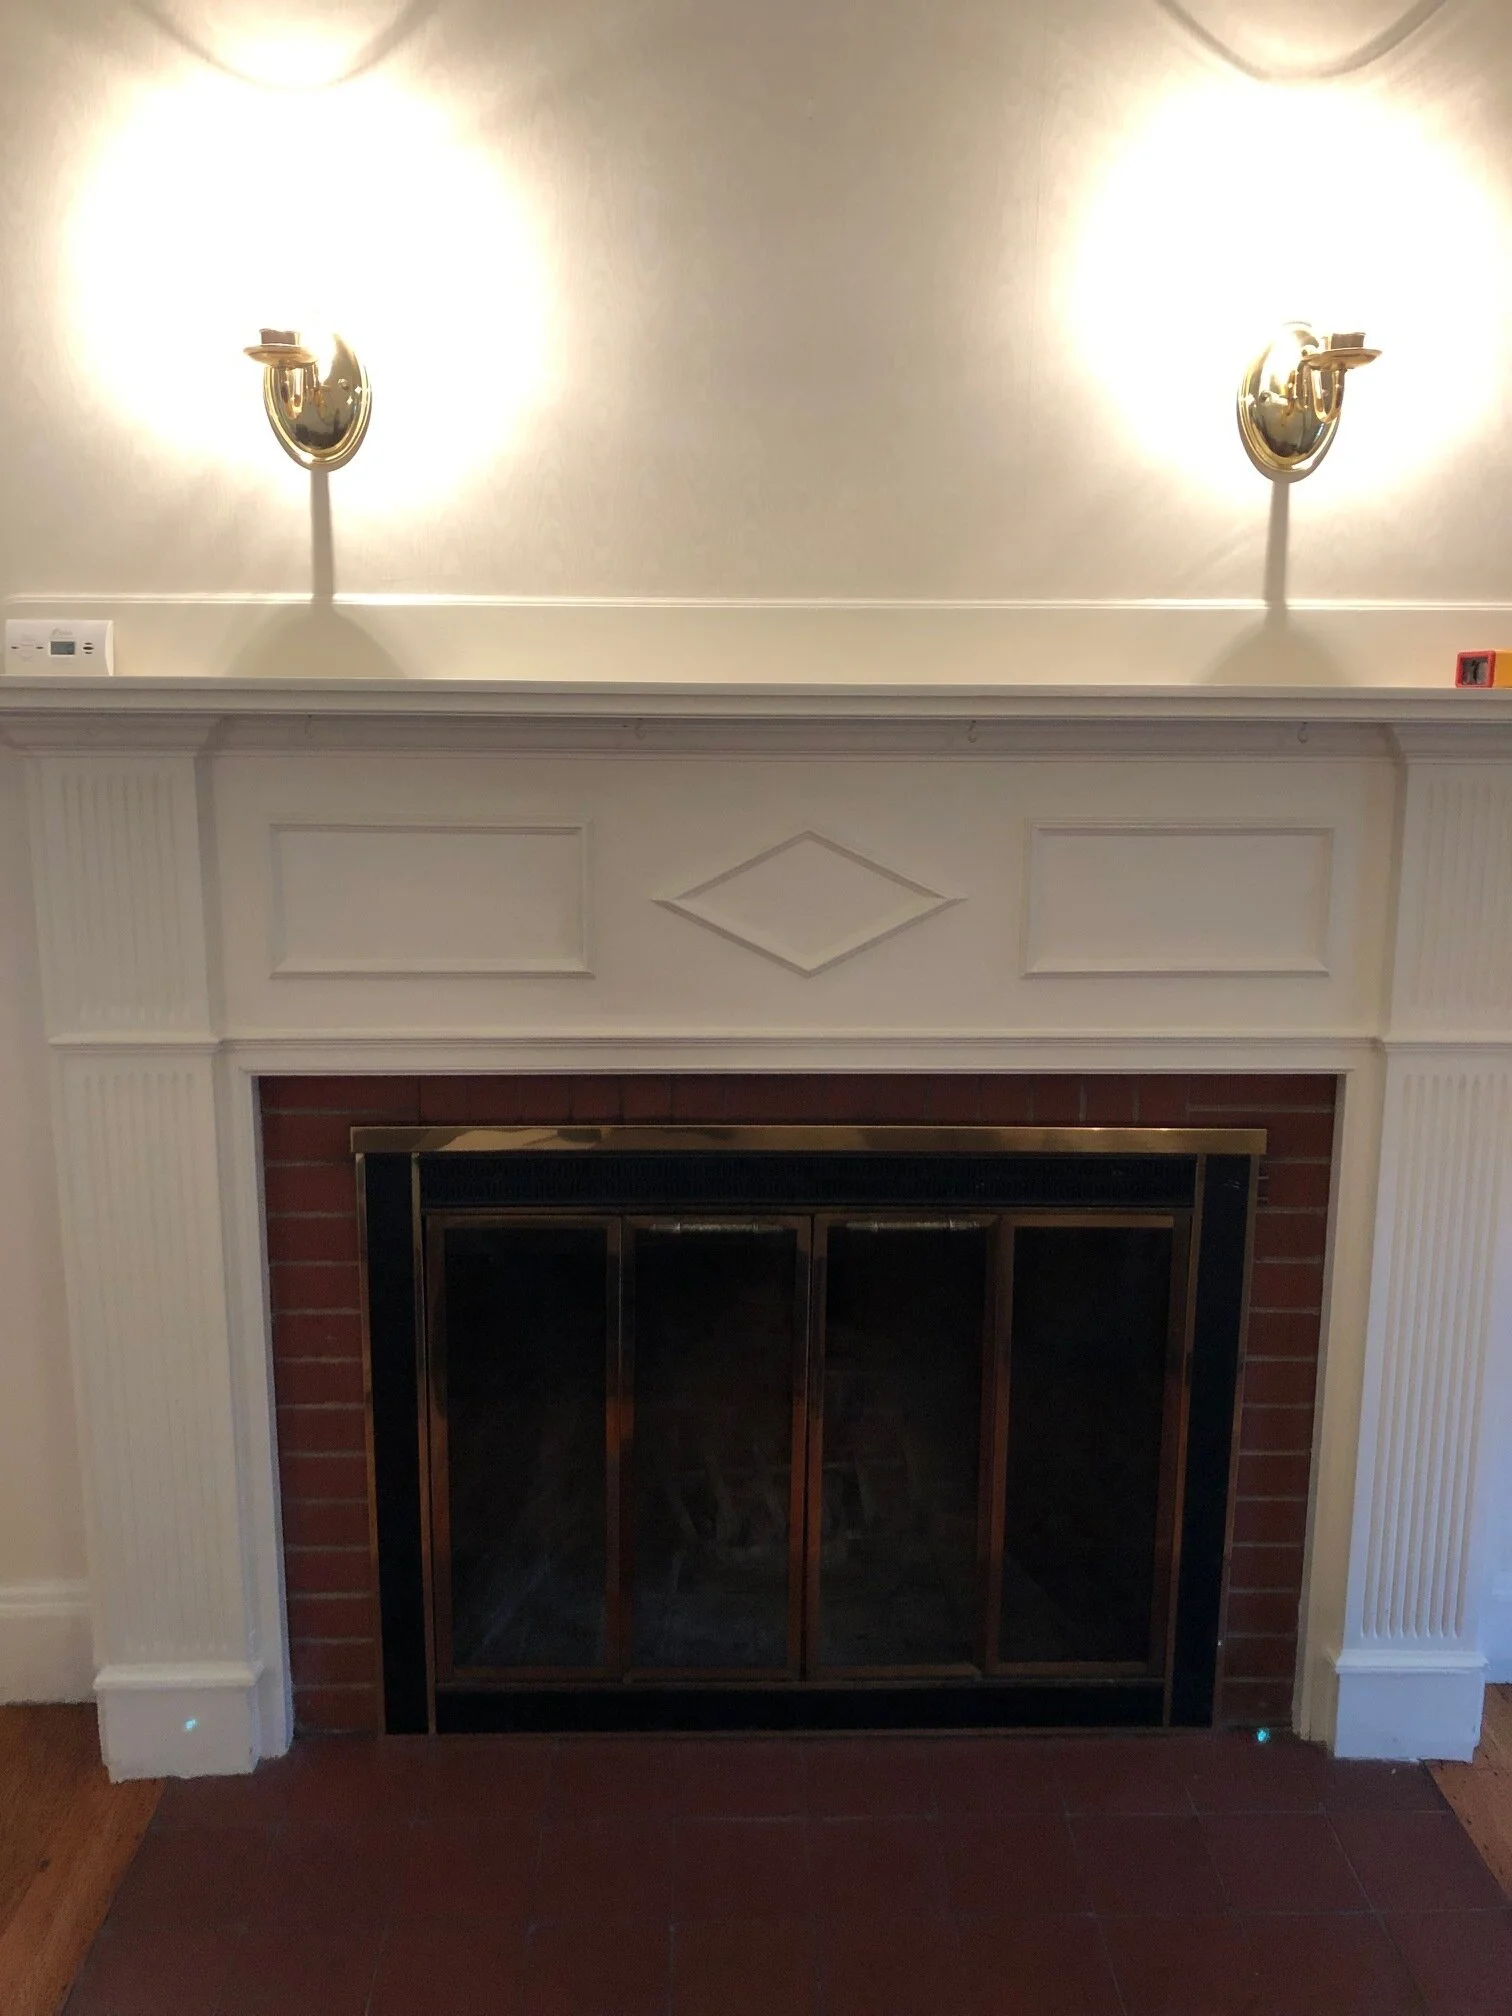
Below is where we started.

Gray Oak Studio - Fireplace Transformation - Before Photo

Red brick surround (not the beautiful, vintage kind of brick). Red tile hearth to match. Brass and black bi-fold doors. Decorative molding that looks like an afterthought. Awkwardly close, shiny brass sconces.

Here’s another look for good measure,. You can see the true colors at play.

 
Gray Oak Studio - Gives Back - Before Fireplace Transformation
 

Our first update was to remove the rectangle and diamond molding on the front top panel of the wood surround. They weren’t quality details and they were dating the entire feel of the surround. Willow Carpentry (who donated their time!) carefully popped them off, then Big Dog Painting (who also donated their time) cleaned up the area by smoothing the ridges where the molding came off, priming and repainting the whole surround.

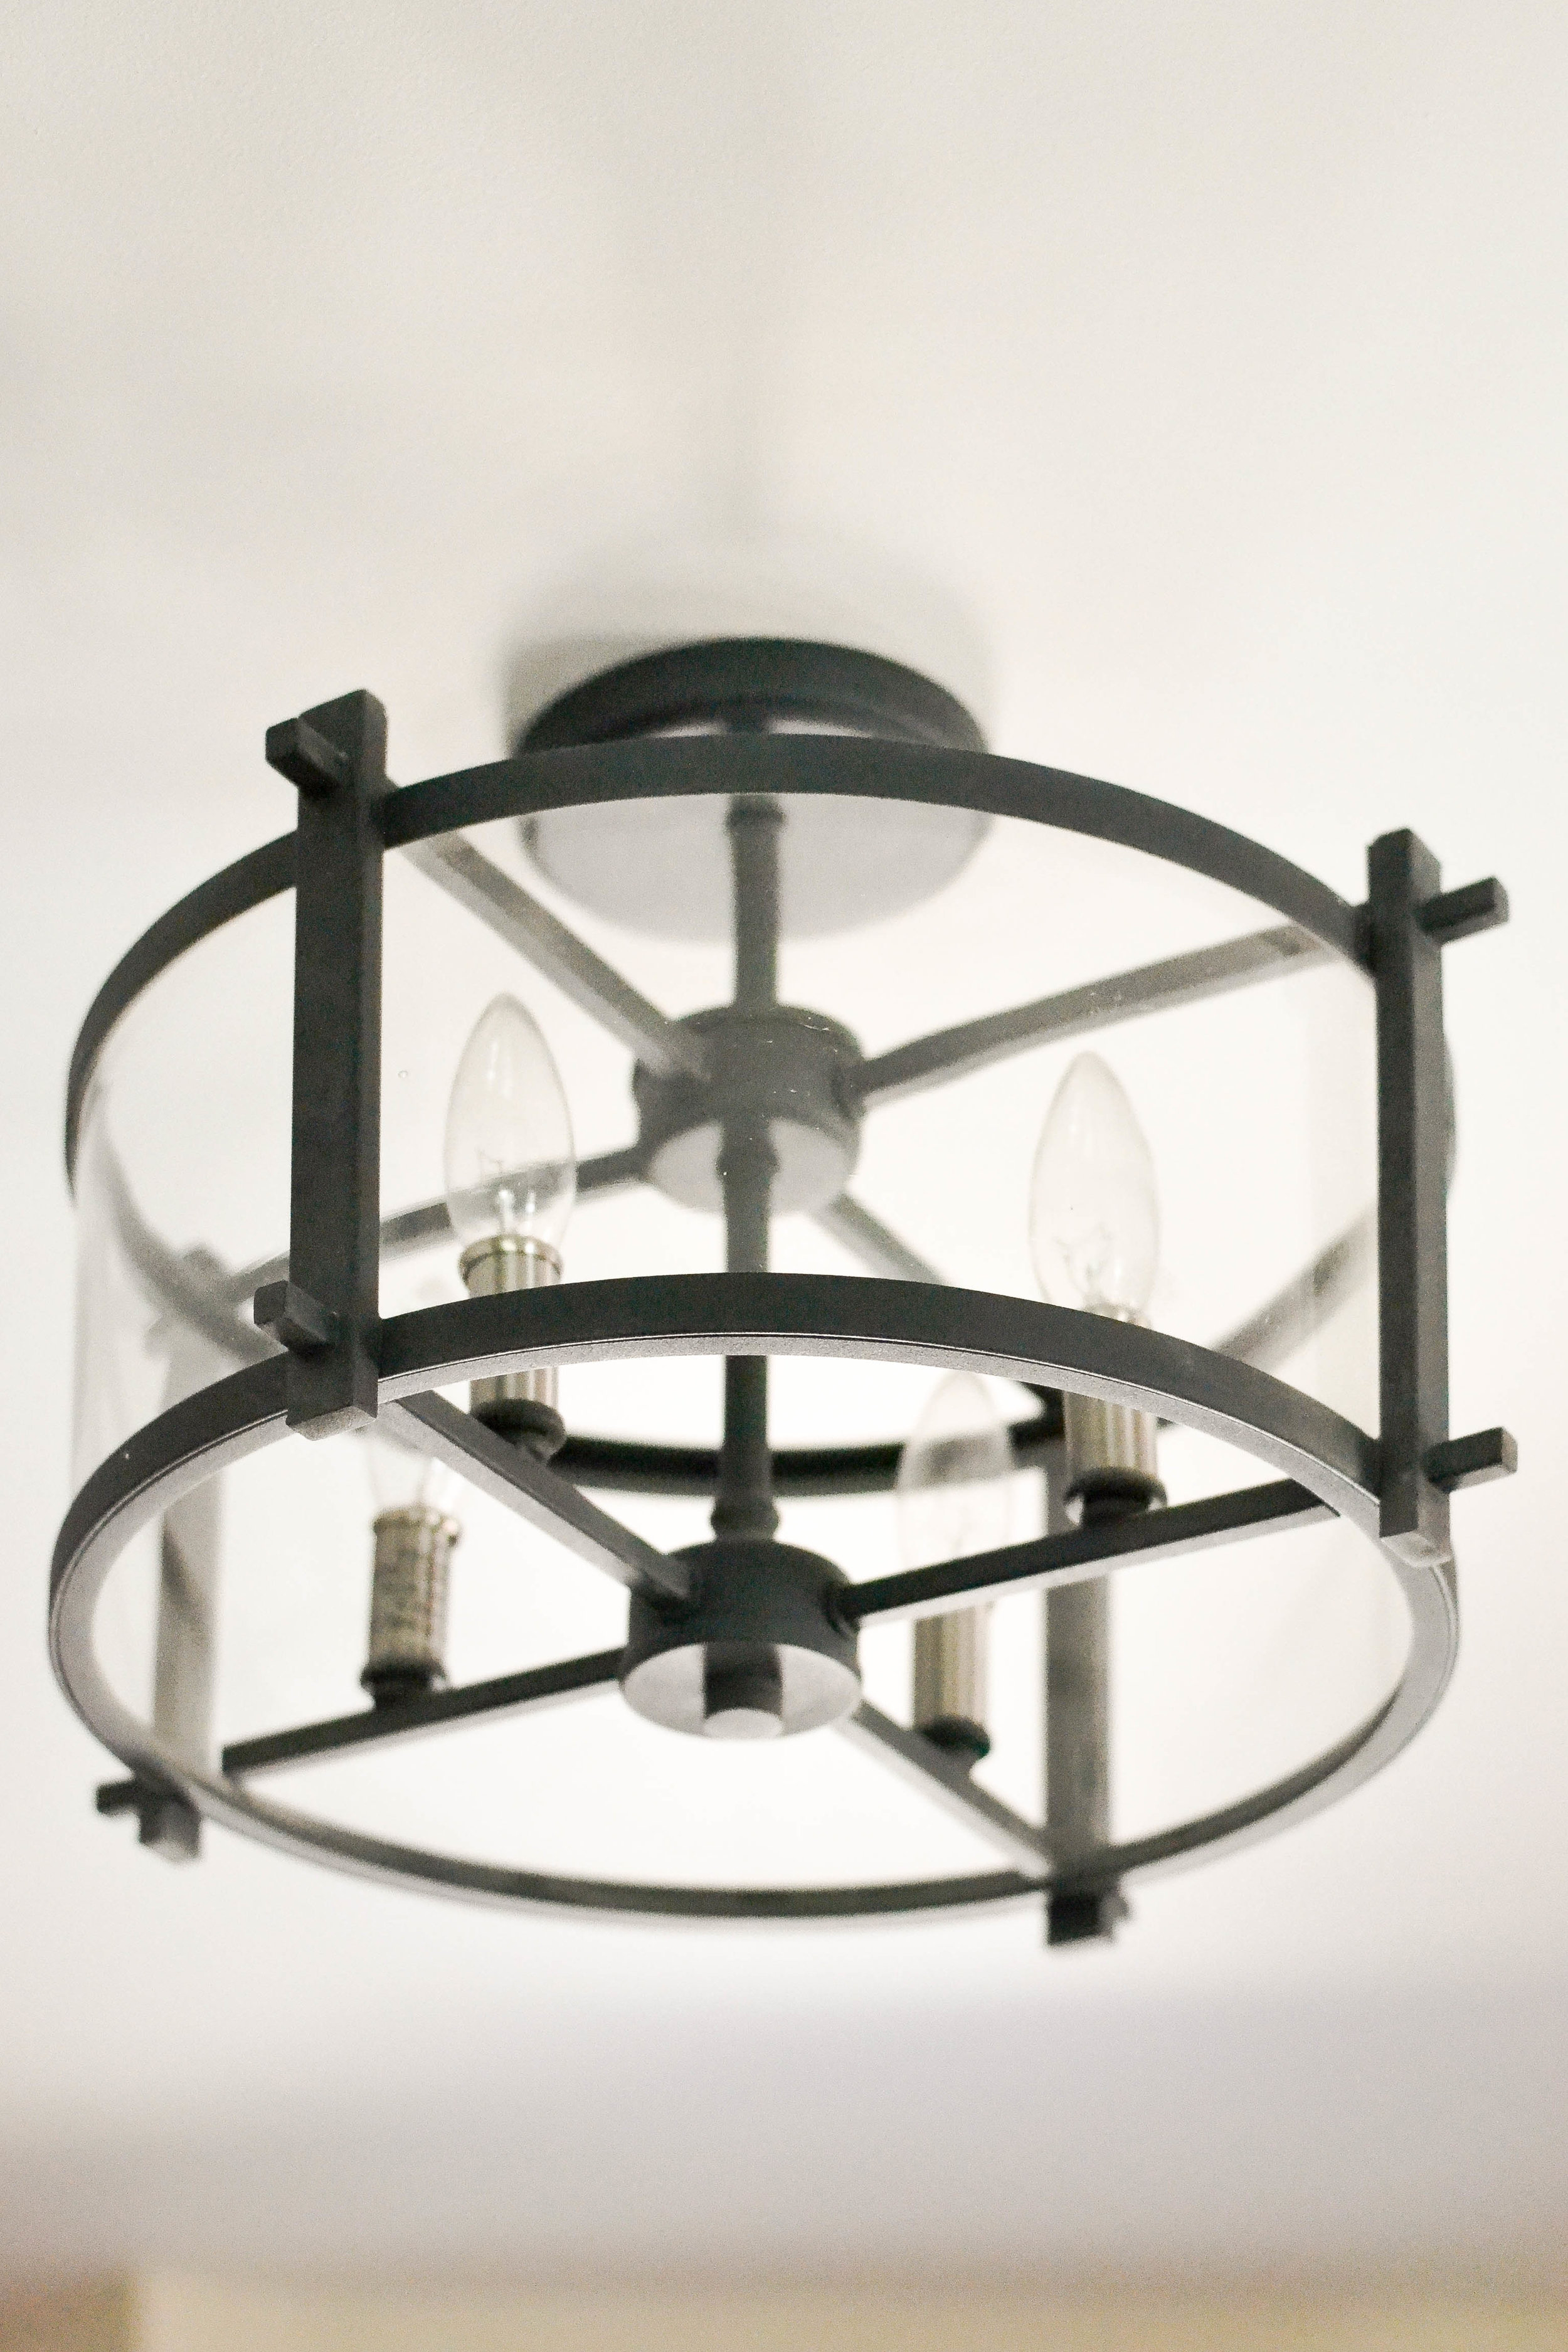
Next we relocated the sconces - they were just way too close. By separating them we were able to capture the actual width of the mantel and take advantage of the wall space above to create a true focal point in the room. Big thanks to Hanson Electric, who…also donated his time.

So much better already, right?

Gray Oak Studio - Fireplace Transformation - Update Molding

Next up, we removed the original door. Well, technically, we didn’t do the removing - our client handled that. They need a shoutout for being a very handy duo. From what we heard, it was pretty straight forward. Just taking out a few screws, a push here, a pull there, all set.

Then, we painted the interior of the firebox with a firesafe black paint. Another quick, DIY update.

Gray Oak Studio - Fireplace Transformation - Remove Fireplace  Door

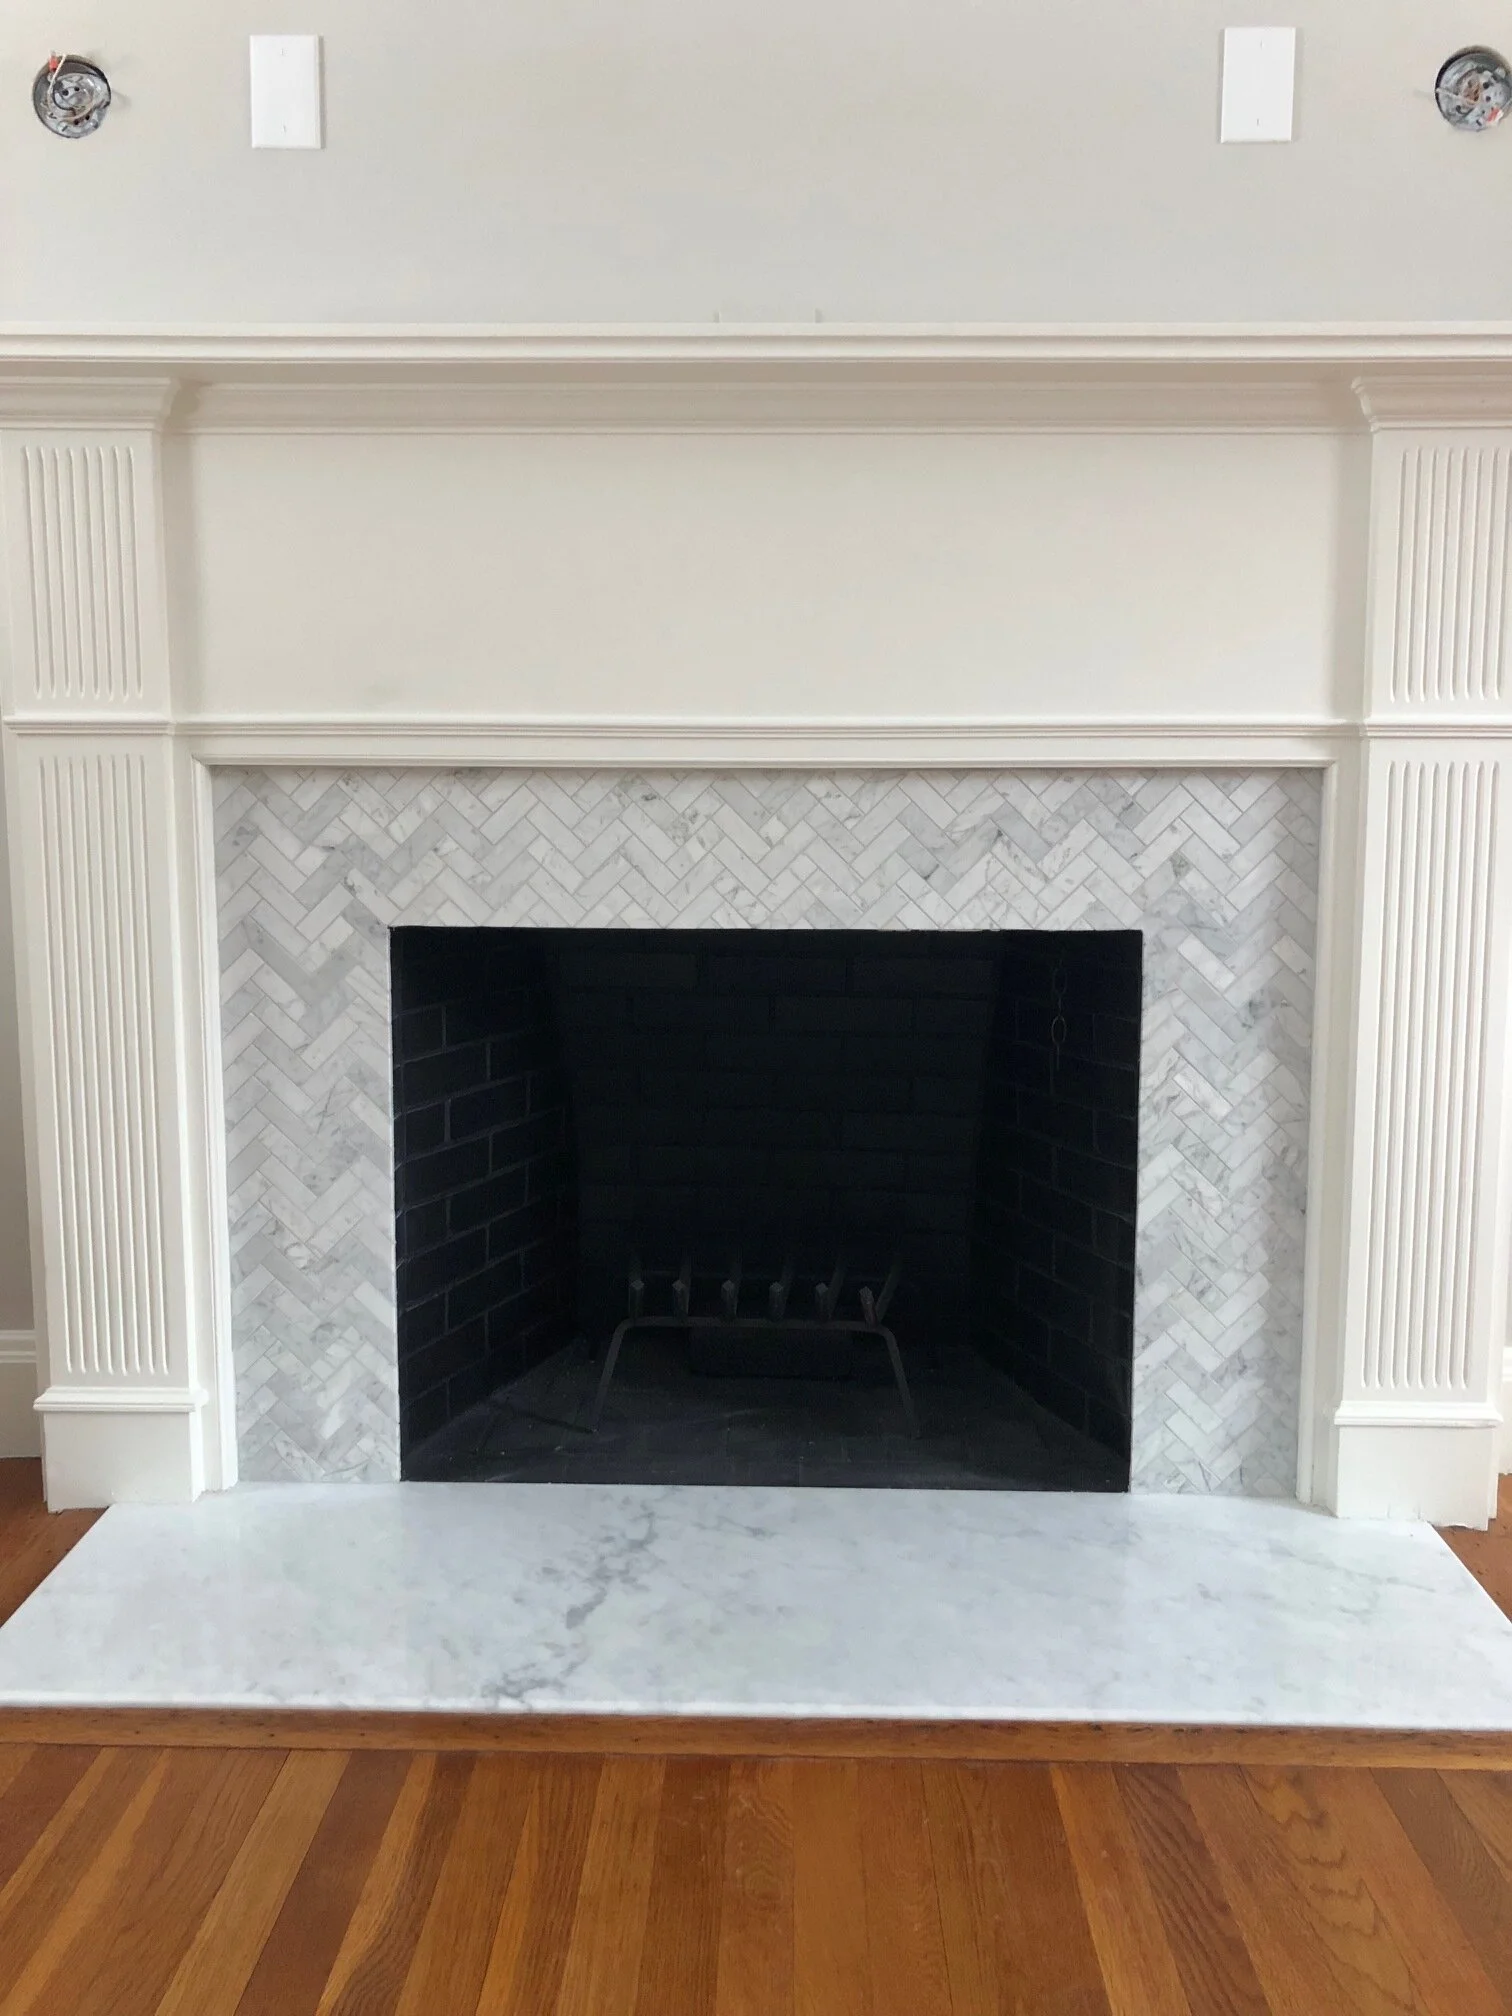
Up until this point, the changes were relatively simple and budget-friendly, all great DIY updates (minus the electrical work) that created a fantastic update. From here, his transformation is a little less budget-friendly and you definitely want to involve a professional - tile over the brick surround and replace the tile hearth with a stone slab.

But, in order to keep it budget-friendly and within the DIY realm, you could also just paint the brick and tile - we would recommend black. Be sure to ask someone at your local painter for the right paint and the right process. There is likely a special type of paint required that will properly adhere to the brick and tile and maybe a sealant needed to keep it from flaking off.

For this special project, we were incredibly lucky to have have Wayfair give us deeply discounted tile for the surround. We chose a small scale marble tile in a herringbone pattern. The contrast of a small scale tile for the surround and a large scale stone slab for the hearth is great choice - it’s balanced in scale and classic. Speaking of the stone slab, Worcester Marble and Granite not only donated the marble slab, but also donated their time to fabricate it (cut it to size and bevel the edges).

Gray Oak Studio - Fireplace Transformation - New Surround and Hearth

One important tip on the installation of a stone slab hearth: You need to consider the thickness of the existing tile you’re removing and the thickness of the new stone slab you’re installing. The average tile is between 3/8” and 1/2” thick. The average stone slab is 3/4” or 1.5” thick. For this project, we removed a 3/8” tile and installed a 3/4” slab and beveled the small edge that raised above the surround wood floor. When removing tile to replace it with a stone slab, the only way to get the stone slab flush to the floor is to demo the mortar/floor beneath the old tile. This is complicated (and significantly more expensive).

Okay, let’s review:

1) Remove outdated molding, paint entire wood surround (and walls)

2) Relocate sconces

3) Remove original bi-fold brass door and paint firebox black

4) Tile over brick and replace tile hearth with marble slab

Last up: Let the tile dry and finish the job with grout.

Gray Oak Studio - Fireplace Transformation AFTER

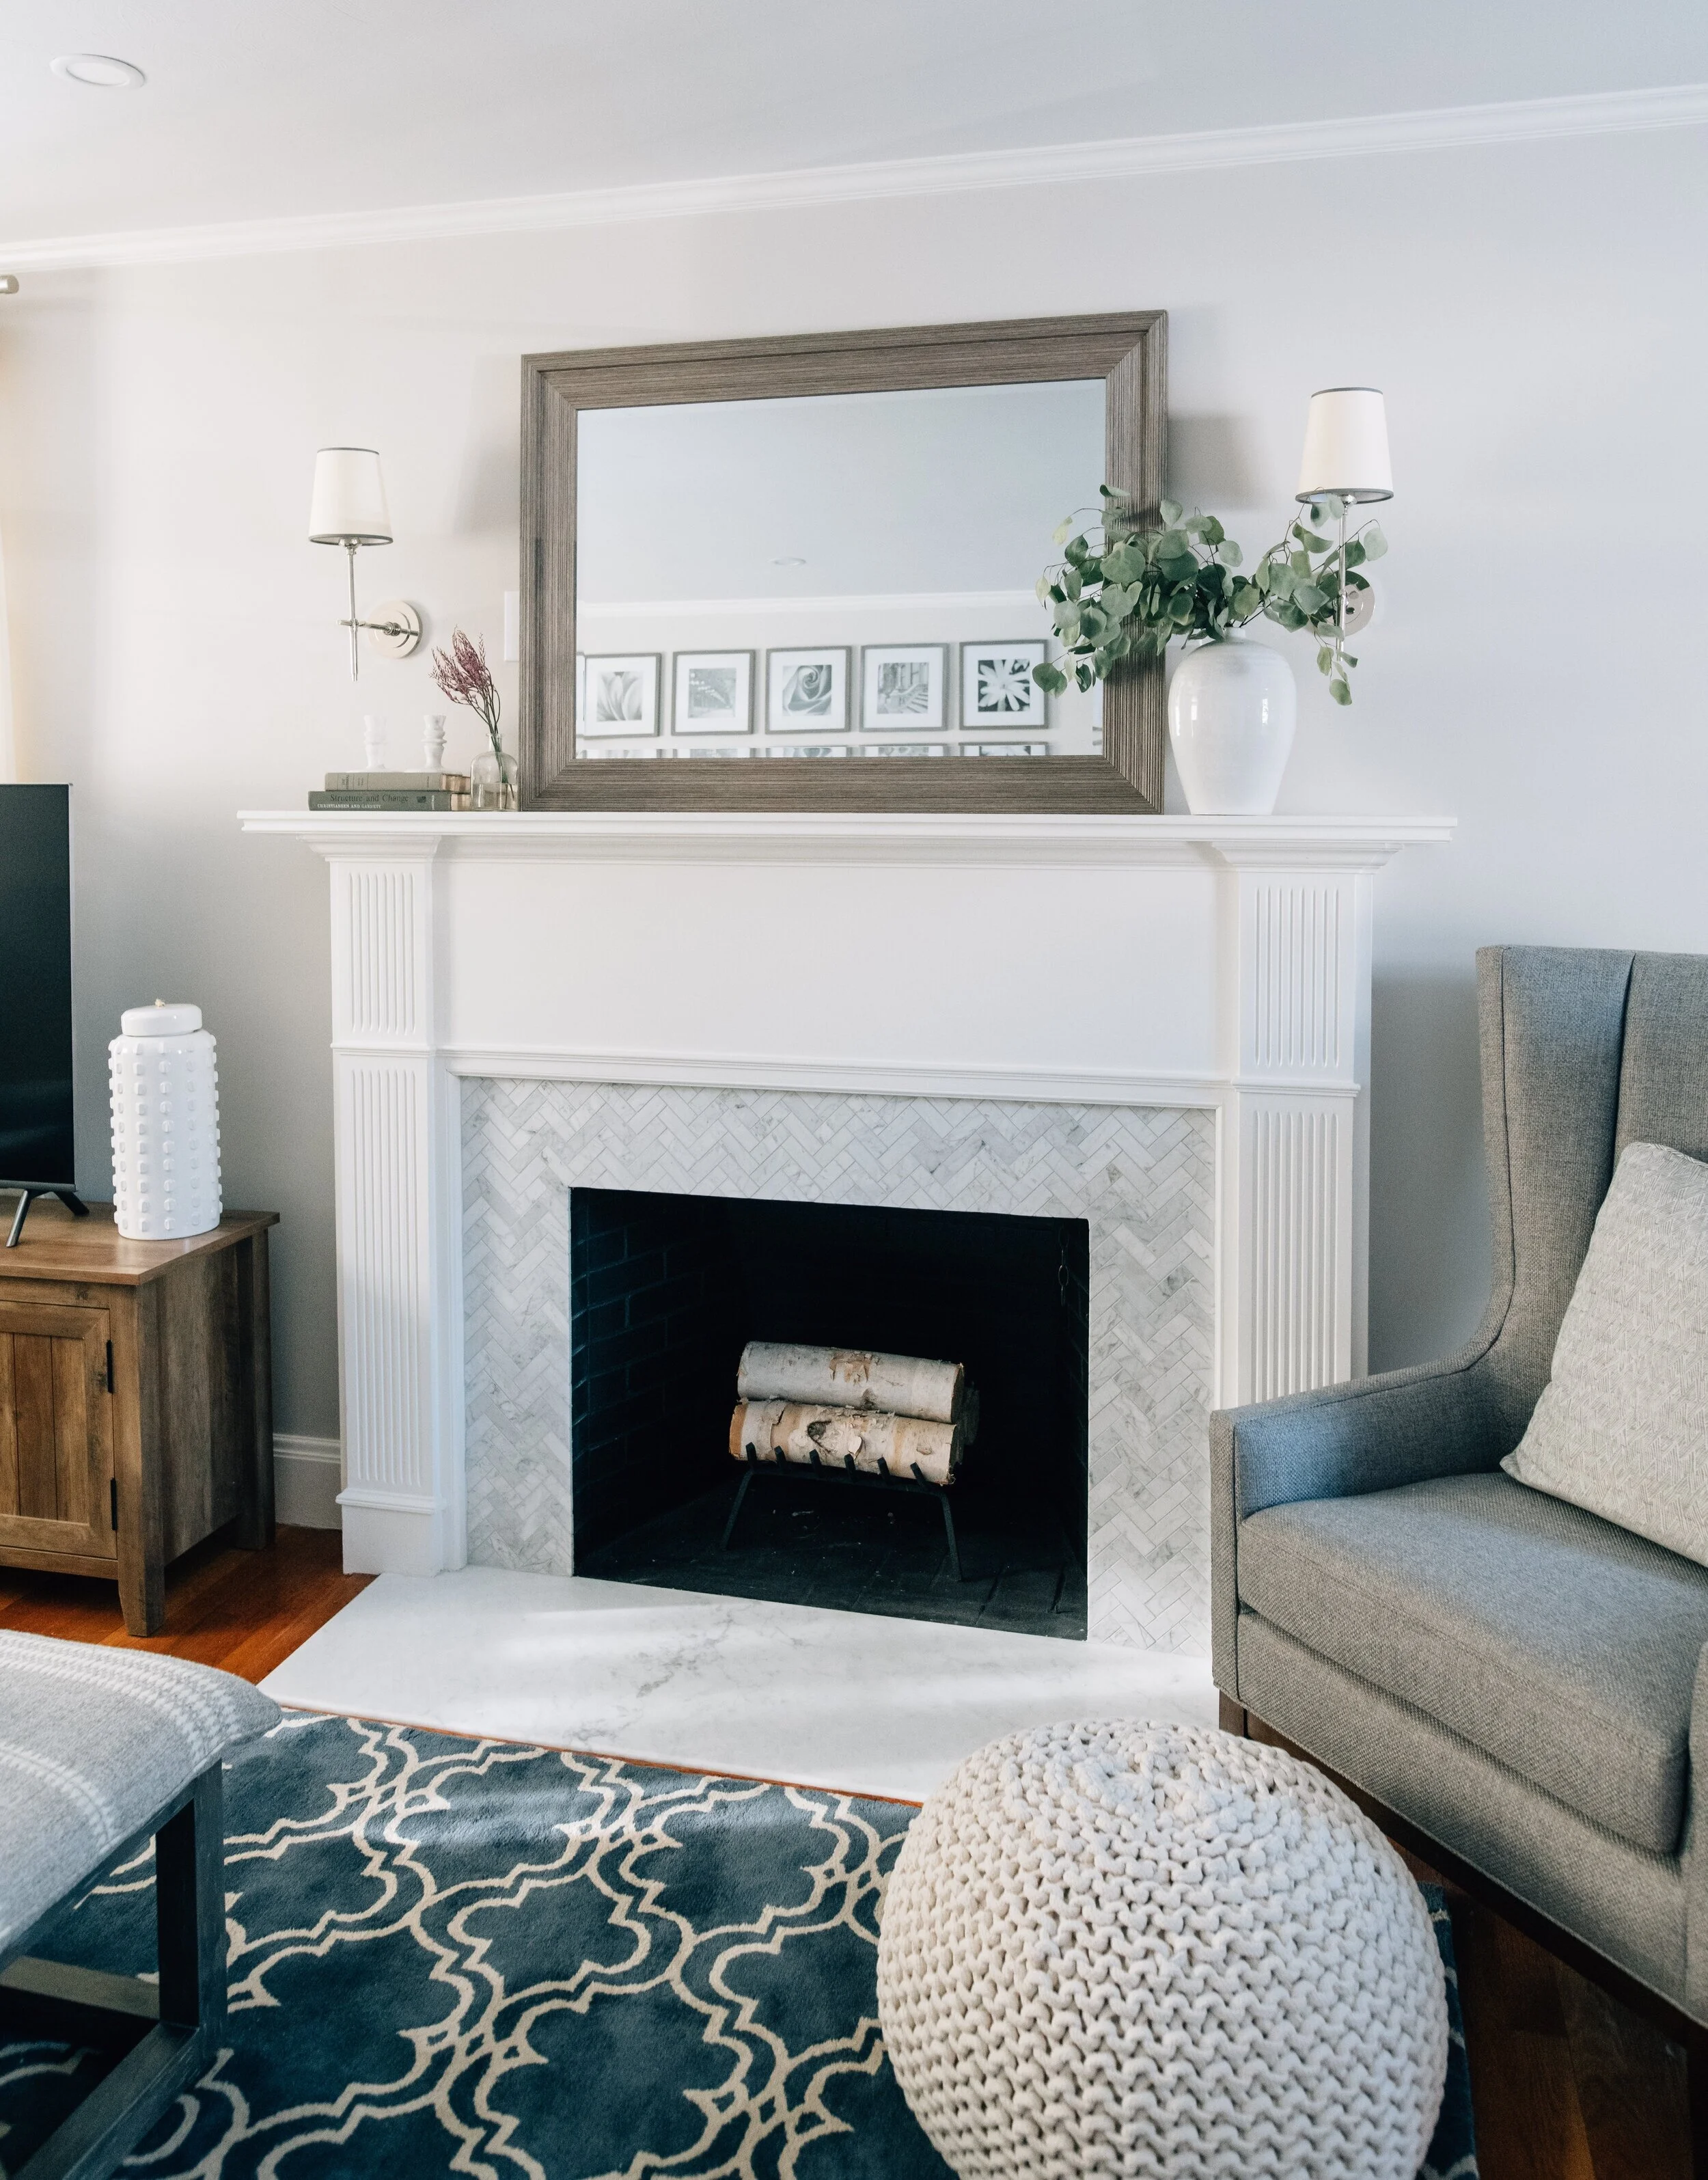
And here’s a side-by-side.

BEFORE

BEFORE

after

after

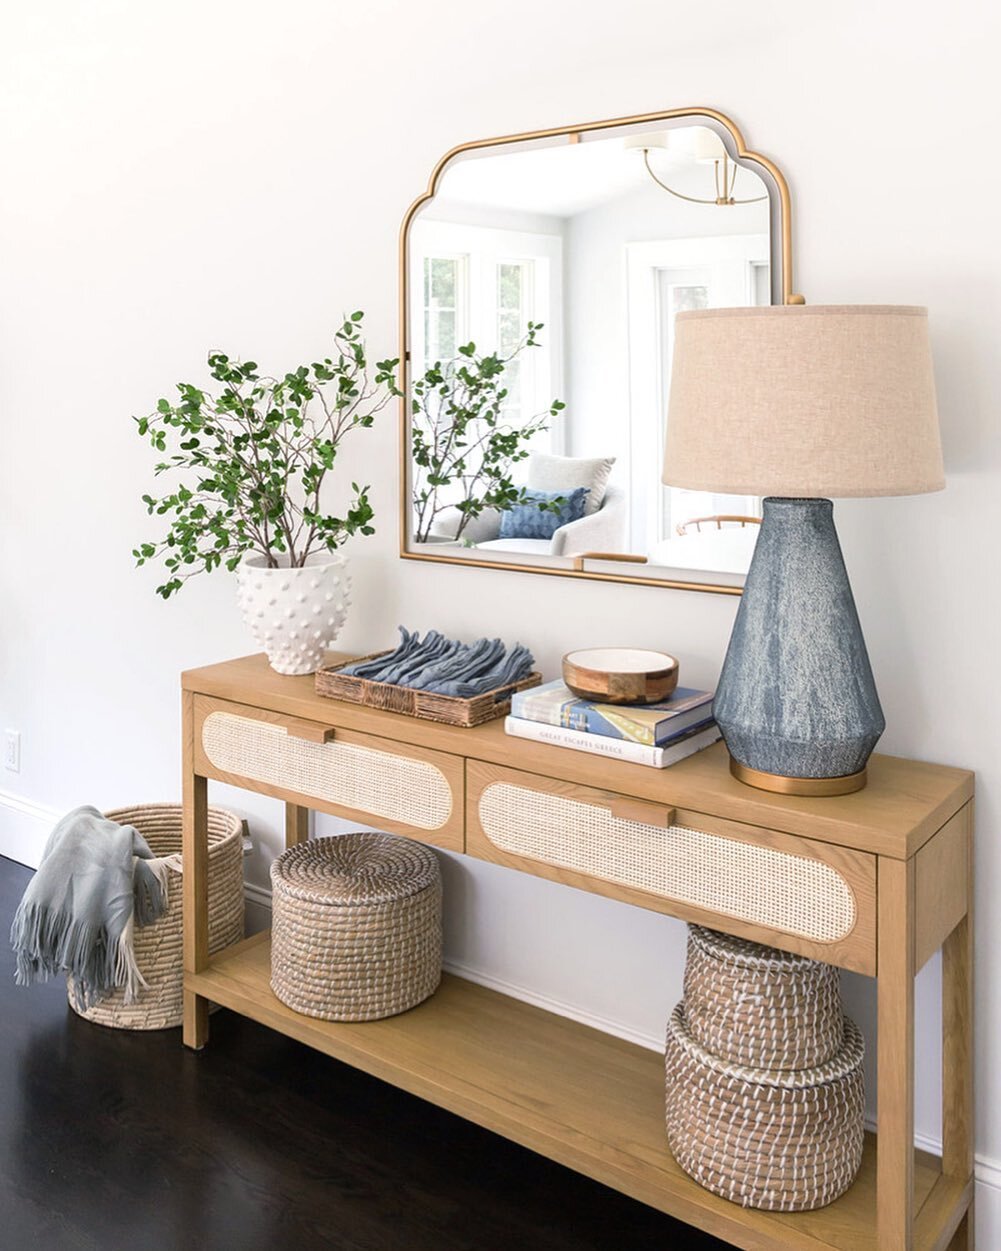
Add breathtaking sconces (donated by Light New England), a mirror and some decor. The transformation is complete!

Gray+Oak+Gives+Back+-+Fireplace+Transformation

Sources: Herringbone Tile Surround / Sconces / Rug / Pouf / Armchair / Similar Mirror

Another thank you to everyone who donated to this part of the project - Hanson Electric, Willow Carpentry, Big Dog Painting, Worcester Marble and Granite (marble hearth slab and fabrication), Light New England (sconces), and Wayfair (herringbone marble tile). Thanks to these donations, this whole shebang was nearly free. In case you’re interested in doing something similar, the actual cost of this transformation would be somewhere around $2,750 (including materials and labor).


We’ll be back soon with all the details on this amazing project.

- Leah

Hutchins Project - Living Room Reveal

It’s been a long while since I’ve written a project reveal post, so I apologize if I’m a little rusty.

Today, I’m breaking down a family room we installed in December for our Hutchins Project. First order of business: is there a difference between a family room and a living room? Not really, but kind of. They’re mostly synonyms. Both terms conjure ideas of a sofa, a coffee table and a media center with a television. A family room is just a bit less formal than a living room. In fact, a family room is sometimes referred to as an “informal living room” in architectural plans. In designing a family room, we focus on creating a space that can be enjoyed by all family members and we take special considerations for the wee ones.

With the (little) kid-friendly factor in mind, we designed this family room with lots of soft corners and lots of storage, but still incorporated all the elevated touches and beautiful details that make it feel polished. It’s sort of like the dress that goes seamlessly from day to night.

Gray Oak Studio - Hutchins Project Family Room Reveal

For this project, we were asked to incorporate the existing sofa, armchair, rug and media center - all the large furniture. In this regard, this room was not a typical project for us. But, we love a good challenge.

Before we even considered the elements we would need to bring into the room, we changed the layout. The sofa and armchair were originally next to each other, both facing the media console. We shifted the armchair to the opposite side of the room to create seating more conducive to conversation (without detracting from TV viewing angles!).

{Design Tip}: Perpendicular seating, versus caddy-cornered seating, is best for conversation because no one is craning their neck, and, the right angles created by the furniture arms are modern and clean.

Unfortunately, we forgot to take a true “before” photo because during our initial meeting with these sweet clients we moved the armchair immediately after shaking their hands and introducing ourselves. “Hi, I’m Sonia.” “Hi, I’m Leah.” Awkwardly long pause as we make eye contact, know exactly what needs to be done, quickly consider if it’s too soon to start moving their furniture, then ask even though it definitely is too soon, “Would you mind if we moved your armchair? It’ll just take a sec…”

In the “before” photo below, we had already shifted the armchair. So just imagine the armchair next to the sofa, also facing the television, on the side closer to the camera (not the window side).

 
Gray Oak Studio - Hutchins Project BEFORE photos
 

After (immediately) tackling the layout, we dove into the design. With this being a family room we had a few goals in mind: storage, comfort and beauty. We added storage with two floor baskets and four baskets in the media console. We envisioned the floor baskets as catch-alls for random toys that sneak out of the playroom. Pop a snuggly blanket over said random toys and the clutter is hidden for guests or for your own sanity.

 
Gray Oak Studio - Hutchins Project Family Room Reveal
 

In addition to creating storage, the baskets in the media console were also great for creating a more simple, clean visual that doesn’t compete with the television. Because when you’re watching Trolls for the 157th time, you need to be able to focus. I kid. But truly, styling open shelves around a television is a different ball game than styling a bookcase.

A media console is already filled with the TV, cable box, stereo equipment and some other necessary uglies. Keeping the surrounding decor simple will create visual comfort in this naturally busy element of the room. Using a simple color palette and larger decor is key. Here, we switched out the silver knobs for matte black, and kept the palette to brown (woven baskets and wood vases), blue and white. The greenery is our only true color. For decor, we repeated just a few items: baskets, books and vases/planters.

Gray Oak Studio - Hutchins Project
Gray Oak Studio - Hutchins Project Family

The cozy factor was met and exceeded with two overstuffed, wool ottomans. They have fabulous texture that is great for kicking up your feet or launching off onto the sofa superman style. Throw pillows and blankets also added to the cozy vibe while remaining functional for all that impending fort building. And the long, linen curtains added to a comfortable, inviting feel of the room.

 
Gray Oak Studio - Hutchins Project Reveal - Family Room
 

At last - how did we make it pretty? We started with a fresh coat of paint on the walls - Nimbus by Benjamin Moore. We also added a beautiful (and textural…cozy vibe) light fixture and two lamps. The addition of any type lighting is an opportunity for beauty and function. Finally, we created “movable” vignettes. These were pretty little nooks and crannies that made the room feel polished, but could be removed and easily hidden away when fort building is underway. For example - All the smaller decor (vases and books) on the tray on the ottoman can be relocated to another surface or hidden in a media console basket without much work.

Gray Oak Studio - Hutchins Project Family Room Reveal

Here is a side-by-side of before (left) and after (right). LOVE seeing the full impact of each design element brought together is one awesome transformation.

Gray Oak Studio - Hutchins Project Family Room Reveal - BEFORE
Gray Oak Studio - Hutchins Project family room reveal

If you’re interested in reading other client project reveals - click here. And, otherwise, until next week!

- Leah

Pilgrim Project - Mudroom Reveal

It's been a while since I've managed to pull together a reveal post for you. Summertime. Ya know.

This reveal is from our Pilgrim Project. And the mudroom, the 3rd room we've revealed from this project, was where the relationship with this amazing client began. She called us after having hired a contractor, but before demo began. Smart lady. We highly suggest to anyone interested in using or even just consulting an interior designer to bring said designer into the fold before plans go too far down the road. So much of what we do is design the physical space itself - not just fill it with furnishings...though we do that too...and we love to do that. It's always easier to consider a space before walls come down and, especially, before new walls go up! 

Be sure to check out the blog reveals of the Pilgrim Project homework station/office and the dining room (part 1 and part 2). You can also always head to our Portfolio for photos of all our projects.

The mudroom in this older home was originally a foyer with a closet. Here's the before:

 
Gray Oak Studio - Pilgrim Project mudroom BEFORE
 

We wanted to nix the closet, which was not an original feature to the home but had clearly been added at some point over the last 100 years, as we discovered an exterior window hidden on the inside!  Relocating the closet to the adjoining office space allowed us to bring in so much more natural light to the space, which is always a plus, and to transform this once dark and uninviting foyer into a light, practical and kid-friendly landing zone for our clients' busy young family. Here's the after:

 
Gray Oak Studio Pilgrim Project Mudroom
 

We live in New England, so clearly we love mudroom benches with double drawers - one deep drawer for shoes and such, and a more shallow drawer to store away hats, mitten, scarfs, your random Barbie...the other stuff. The double hooks are, of course, for coats and backpacks. And, the top baskets are for for all the extra hats, mittens and scarfs that are off season or simply not in high rotation that week.

Gray Oak Studio Pilgrim Project Mudroom and Office

The color palette in this design had a couple considerations. First, we always recommend a neutral palette in a mudroom. Whether that's on the light side with whites and beiges and grays or dark with black and charcoal and navy, the key is neutral. Here's why - all those coats and hats and backpacks and sneakers are going to bring COLOR to the equation. Of course they'll always be put away in their proper spot...of course...but even when everything is neatly hung, the family's outerwear is a rainbow. So keep the backdrop a relatively blank canvas.

Second, this mudroom is completely open to the homework desk/office. We wanted the two rooms to flow into one another seamlessly. These rooms are decent sized, but certainly not huge. When your eye doesn't have to stop and reassess a new color scheme it makes a space feel bigger. 

As with all entryway spaces, we incorporated a mirror, storage and texture. The texture in this space is found in the rustic wood trim and bench seat, the woven baskets, knotted color block pillows, and the jute rug.

Gray Oak Studio - Pilgrim project mudroom

Entryways and mudrooms will always be one of our favorite rooms to design - they are the ultimate marriage of form and function. Being able to create beautiful spaces that work for the people who live in them is our FAVORITE. Gorgeous is the goal, but it won't matter how pretty any space in your home is if it's unusable. 

And now, the details.

Gray Oak Studio - Pilgrim Project mudroom baskets
Gray Oak Studio - Pilgrim Project Mudroom
Gray Oak Studio - Pilgrim Project Mudroom Hooks

Thanks for waiting so long for this reveal. We hope your summer is wrapping up with lots of sunshine and ice cream sundaes.

- Leah and Sonia