2 Days 200 Dollars Challenge - Reveal

First we made a plan. Then we got down to it. Today, we’re showing you the finished transformation from our 2 Days 200 Dollar Challenge.

Gray Oak Studio - 2 Days 200 Dollars Challenge - Bathroom Reveal

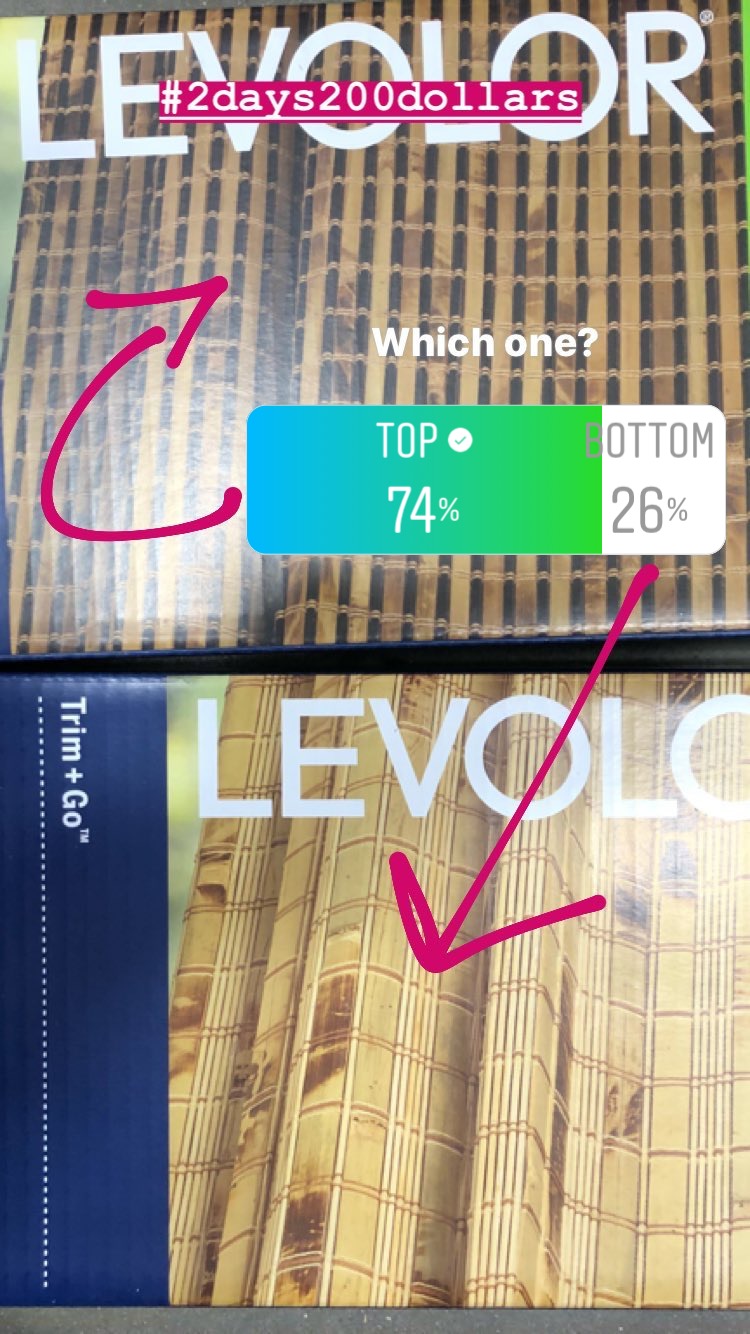
Did you just freak out a little? I freak out every time I look at this picture. Then I peak into my “new” bathroom, maybe even walk in and gently open a drawer in my blue vanity, and freak out a lot more.

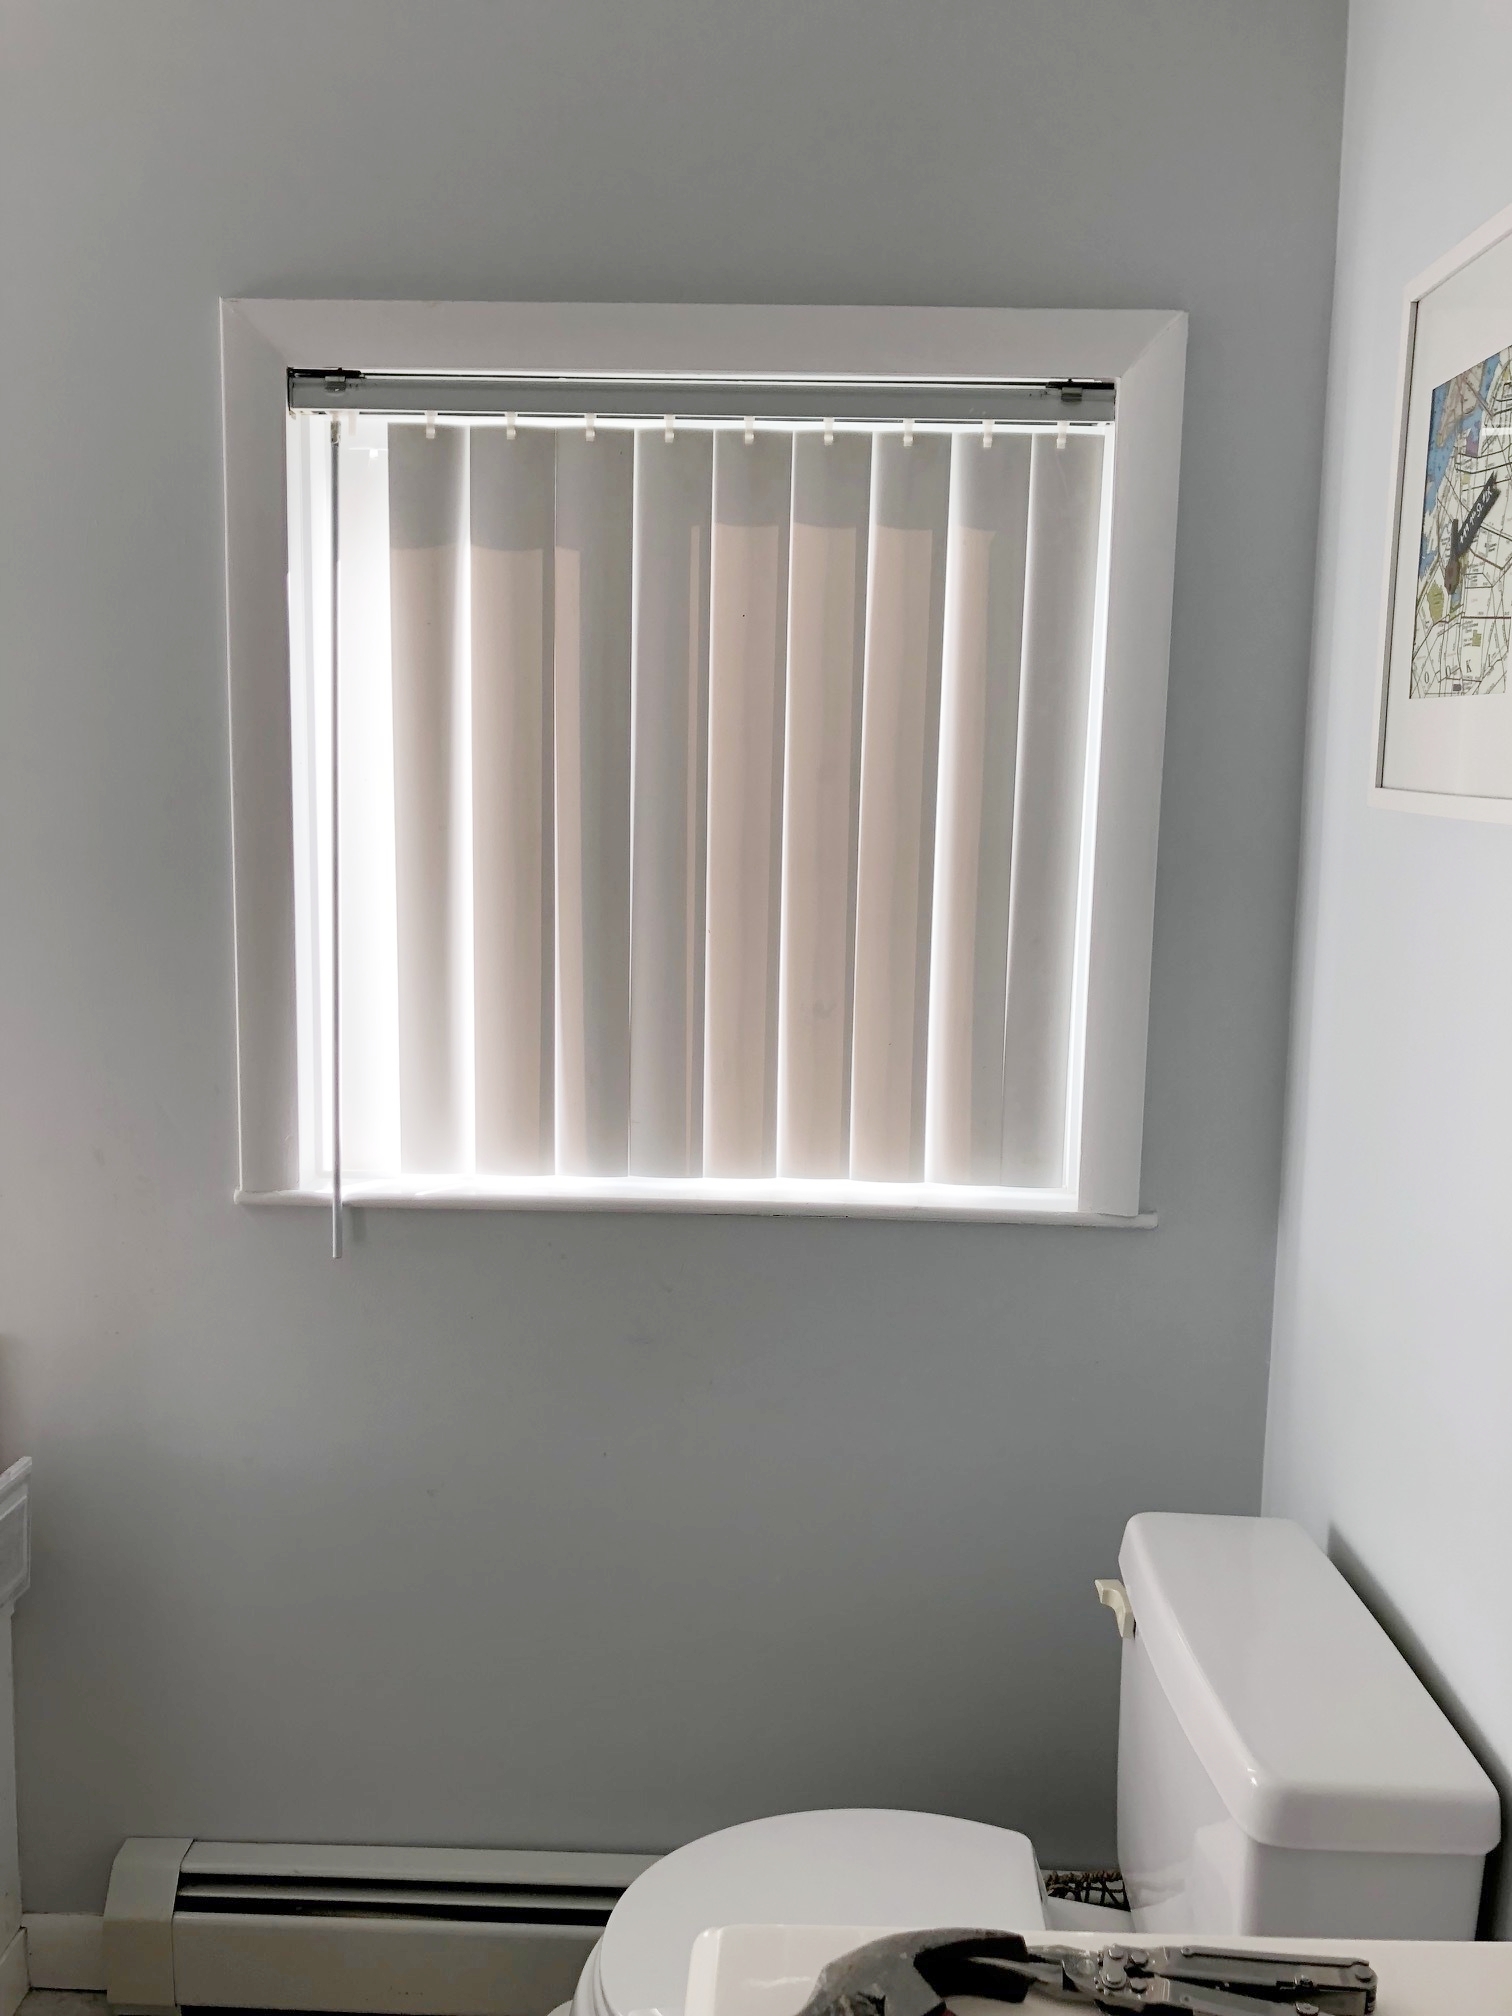
Let’s review how it all happened. After Day 1 of the 2 day challenge, nearly all the heavy lifting had been done - I updated the vertical blinds with a woven shade, primed and painted the vanity, and my husband installed a new vanity light. Day 2 was delayed by a few days while I waited for the vanity hardware to arrive, which was good because it gave the paint time to cure. Finally the pulls arrived…with the wrong screw size. They were too short, which is pretty common and easily remedied. So, I measured twice and then brought them with me to Lowes to buy longer screws.

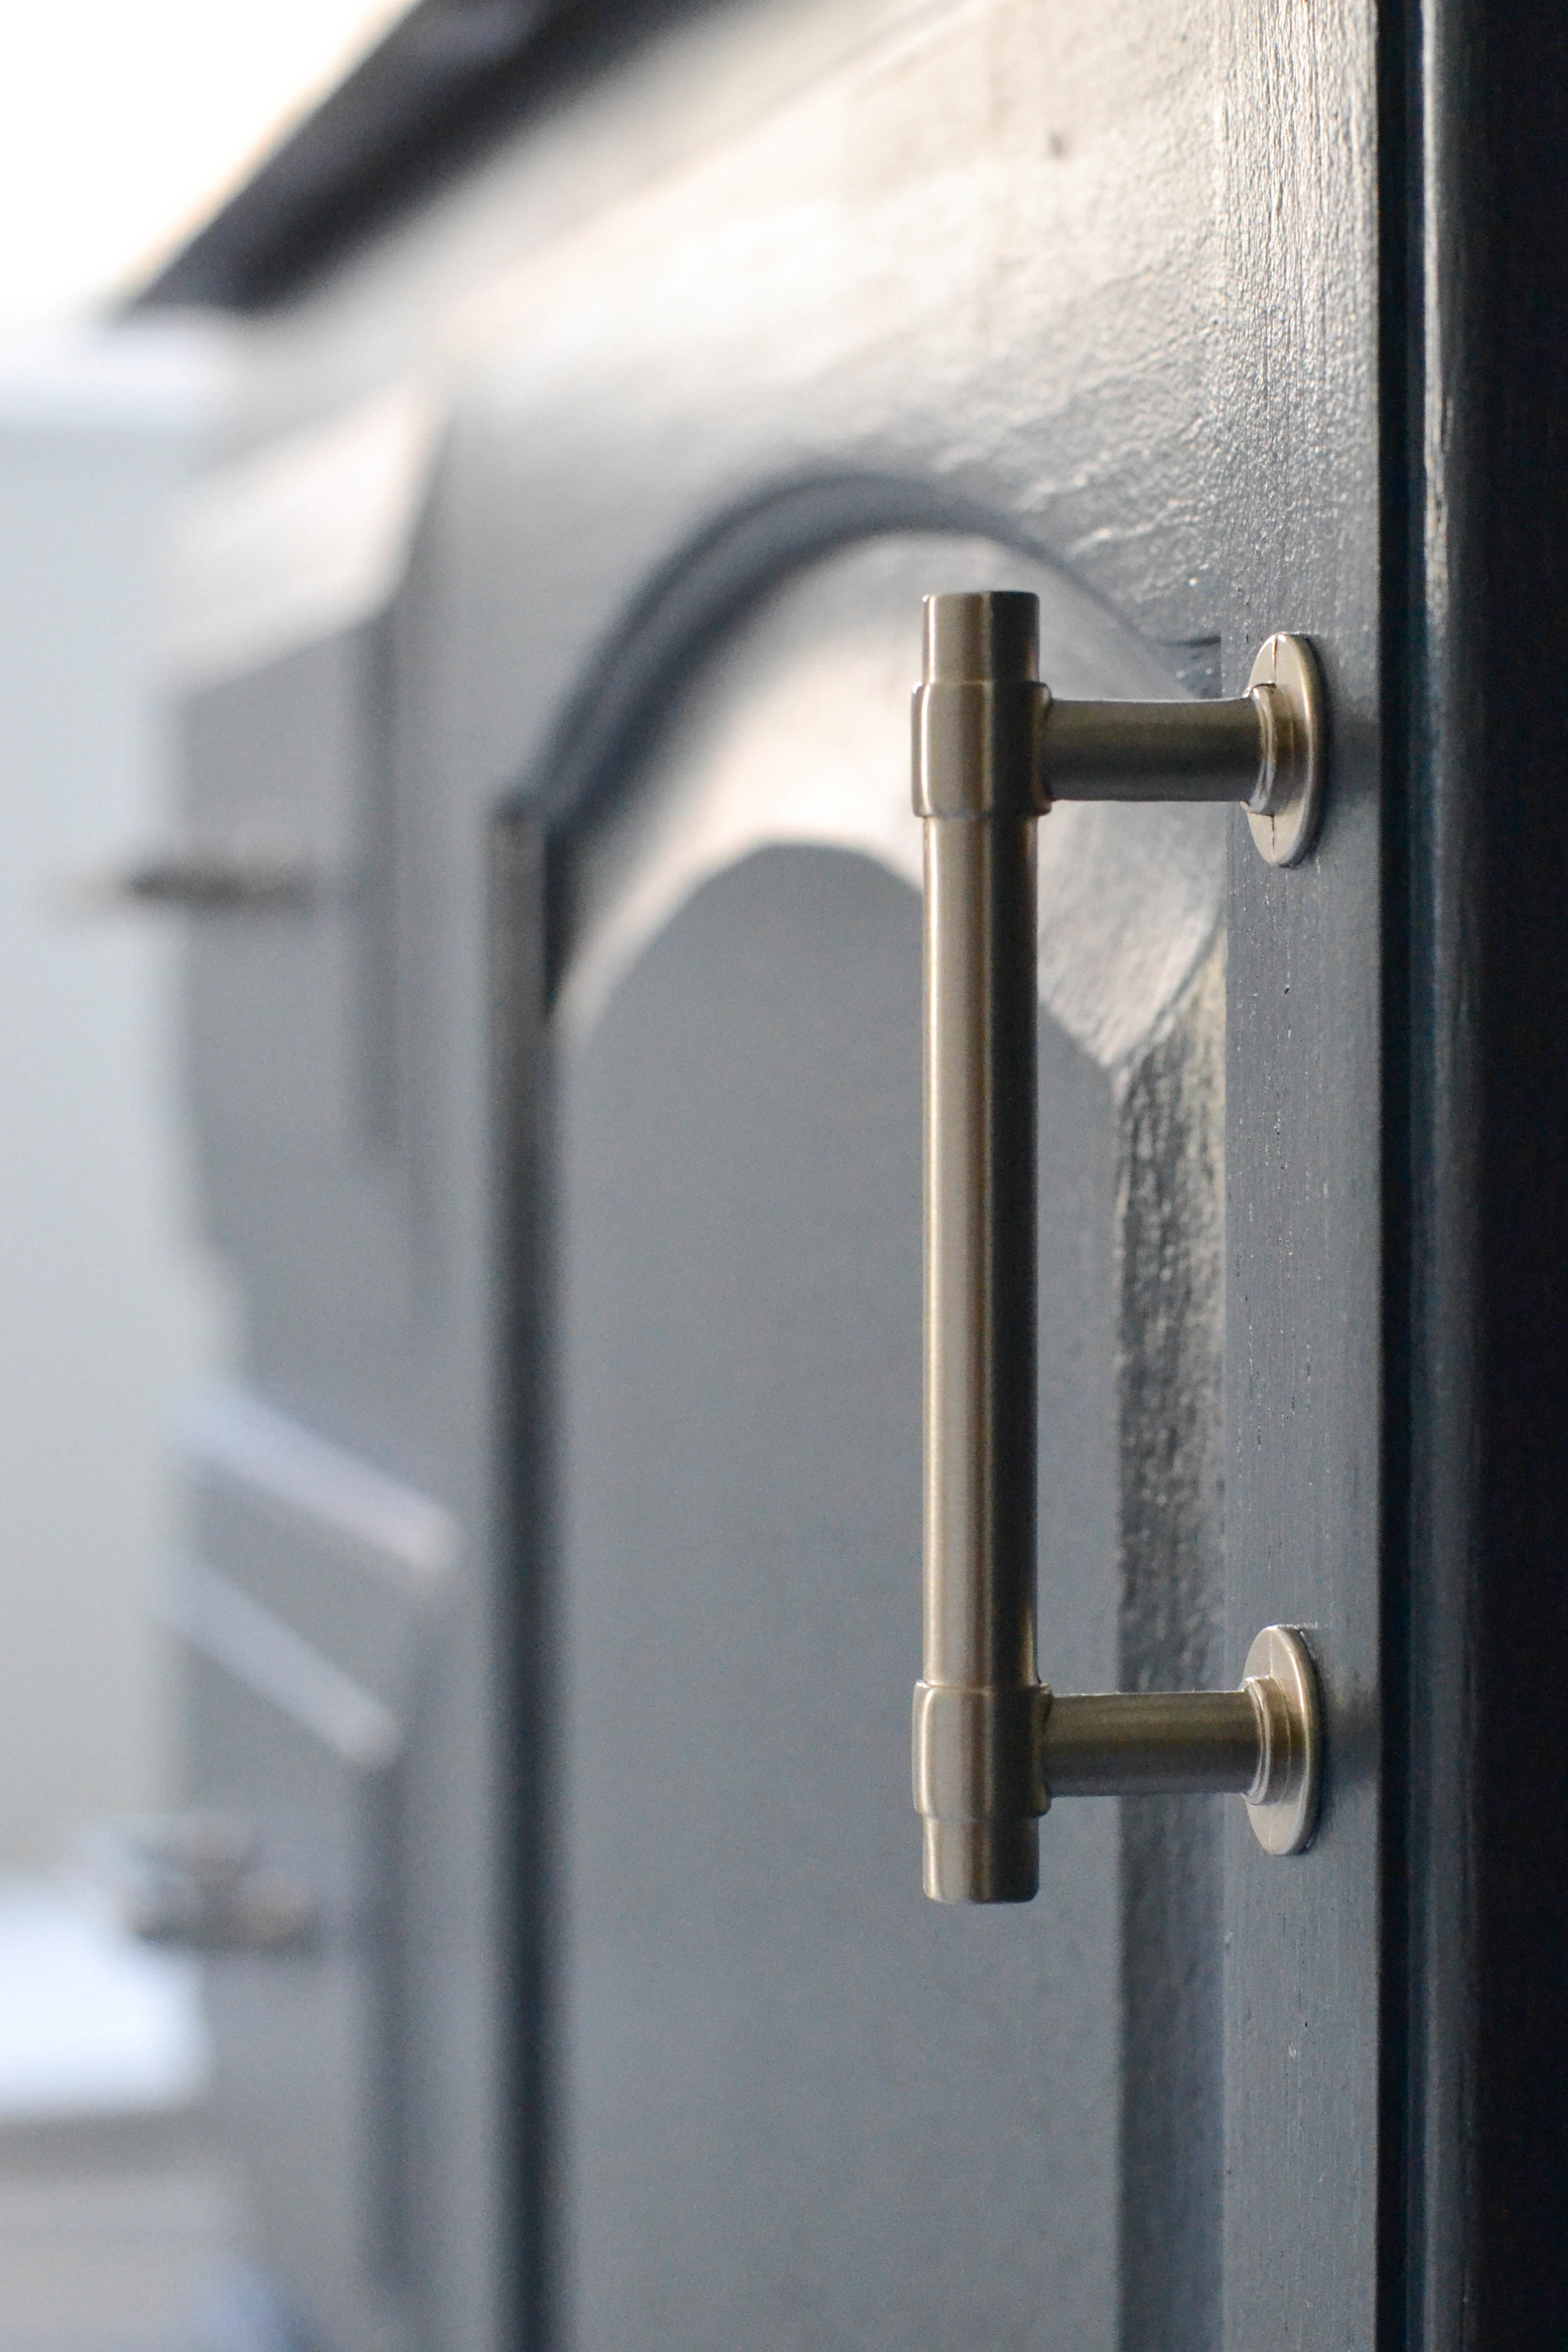
With my new screws ready to go, I drilled a second hole in the cabinet because there was only one hole from the prior knob. Then a few minutes later all seven pulls were installed. Love them. And the price point is fantastic (I have a cost breakdown below).

 
Gray Oak Studio - 2 Days 200 Dollars Challenge - vanity hardware
 

Then came the finishing touches. But before I get into those details, we need a side-by-side to remember what this looked like before we got started.

Gray Oak Studio - 2 Day 200 Dollars Challenge - Before Photo of Bathroom
Gray Oak Studio - 2 Days 200 Dollars Challenge - Bathroom Reveal

Isn’t it just awesome?

Okay, the decor details. I spent my whole budget (and a bit extra…more on that later) on the woven shade and new vanity light. Our plan was to focus on updating the window treatment and the vanity light because those were the elements of the room that made it feel especially outdated…and yucky. As we discussed in our post on the plan for this transformation, window treatments, light fixtures and rugs are truly the makers and breakers of any room.

Speaking of room maker, quick pause for a close up of the vanity light.

 
Gray Oak Studio - 2 Days 200 Dollars Challenge - Vanity Light update
 

So, I had less than zero for my decor budget. The good news is that bathrooms don’t need much decor.

The most glaring issue I needed to address was the art above the toilet. It was way too high because a second frame under it had broken a while back and I never replaced it. First, I found a frame - I have a huge stockpile (doesn’t everyone???). Then it was a matter of finding the right art. I went to my tried and true place for free, awesome art - Pinterest. A quick search resulted in a set of two beautiful watercolors of succulents (here is the source).

 
Gray Oak Studio - 2 Days 200 Dollars - Free bathroom art.
 

Here’s a closeup of the blue. It’s simple and beautiful.

 
Gray Oak Studio - 2 Days 200 Dollars - Bathroom Art
 

Below is another side-by-side before and after to see just how important it was to add another piece of art in that awkward space. I often put smaller frames above larger frames when I’m hanging a set, but the reverse is totally fine too. In this case, no need to hammer extra holes in the wall by moving things around. So the big guy went on the bottom.

Gray Oak Studio - 2 Days 200 Dollars Challenge
Gray Oak Studio - 2 Days 200 Dollars Challenge - Reveal

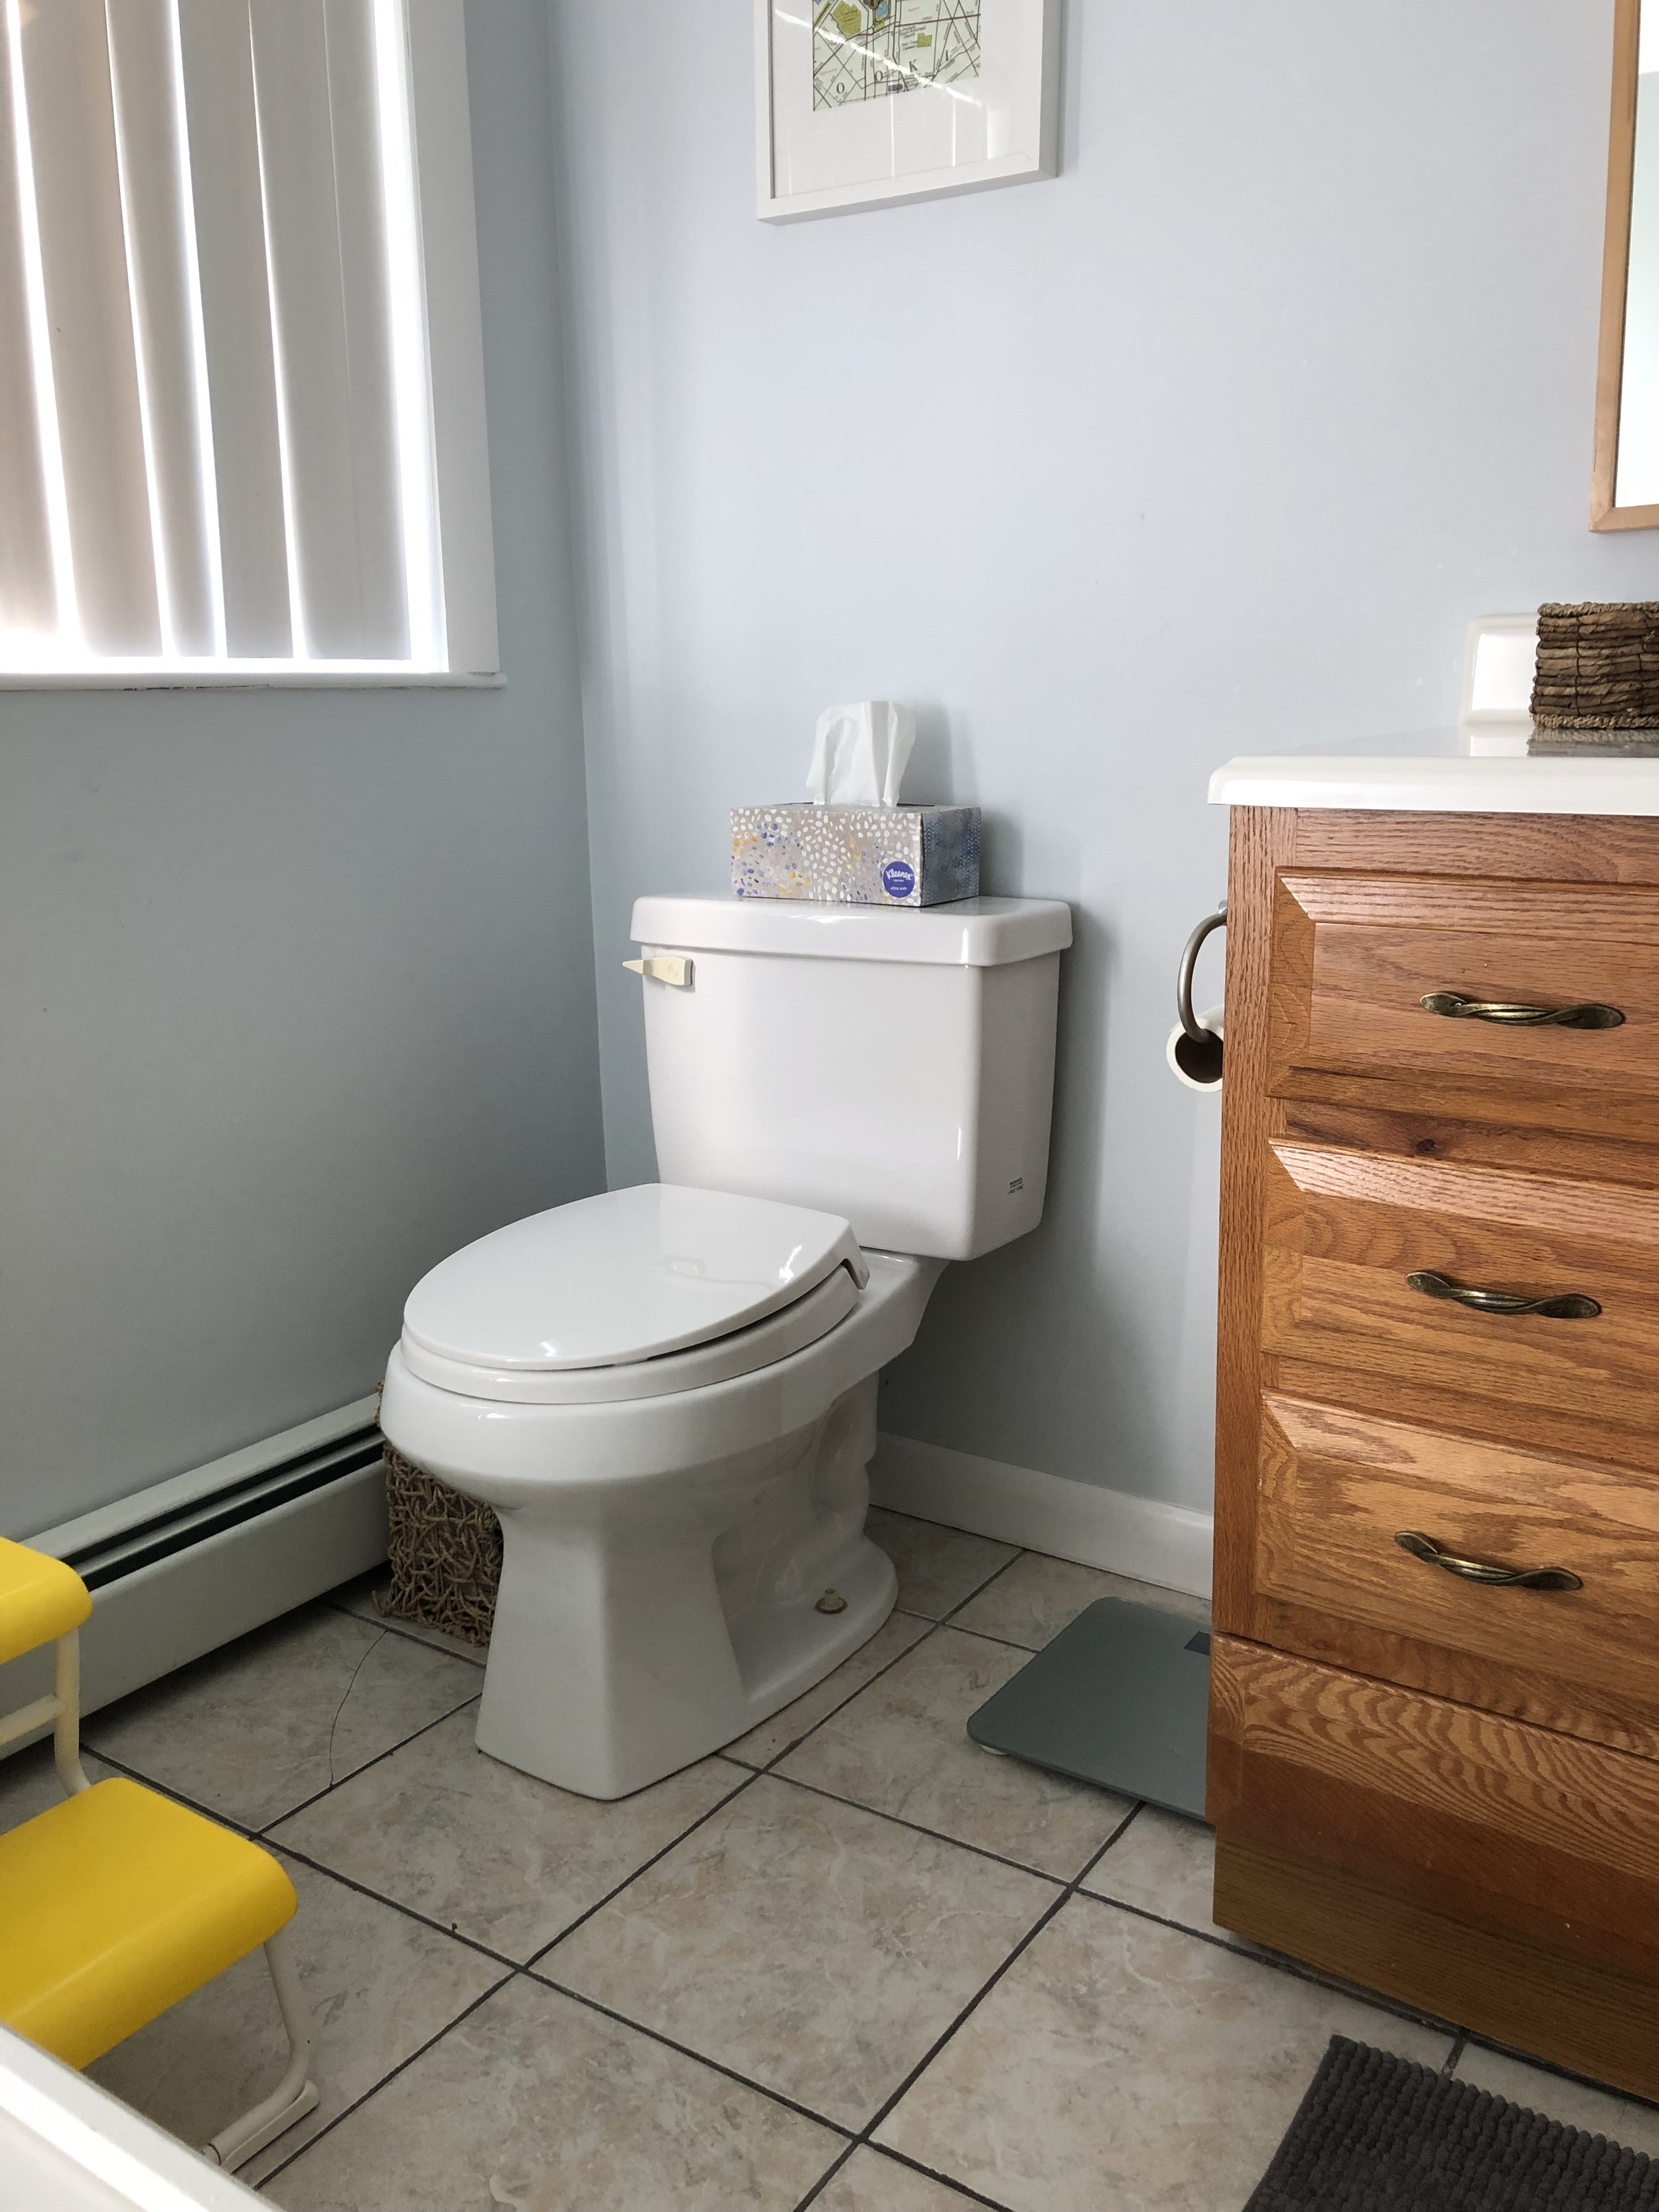
The other decor came from shopping my house. A plant in a white pot is ideal decor for any room in any house. I have them all over. This guy just got relocated. My favorite acrylic tissue box got nabbed from my kids’ bathroom. The existing tray became the resting station for hand soap and a candle. And a big, white rug from my linen closet keeps it light and clean and, most importantly, covers that ugly floor tile!

Gray Oak Studio - 2 Day 200 Dollars Challenge - Reveal
Gray Oak Studio - 2 Days 200 Dollars Challenge - Reveal

And, there you have it. Here is the cost breakdown. And, yes, I’m a rule bender.

Total Spent on the Project - $243

Woven Shade - $87

Vanity Light - $138

Vanity Hardware - $18

Vanity Paint - Mysterious by Benjamin Moore

Wall Color Paint - Silver Cloud by Benjamin Moore

Mirror - from IKEA, no longer available

Tissue Box Holder


Next week, we’ll be back to our regularly scheduled program with a Wednesday Five.

- Leah

*This post contains affiliate links*


2 Days 200 Dollars Challenge - Day 1

Day 1 of the 2 Days 200 Dollars Challenge was broken into 2 days - 1 hour of prep time on a Friday night and a few hours of getting it done on a Saturday. We did a quick check with the judge to make sure we weren’t breaking any rules with our Friday night prep (technically, I don’t think there’s judging in this challenge, just everyone winning with the beautiful spaces they transform). Miss Harper, herself, confirmed that the hour of prep did not count against us. Phew! Check out our Instagram highlights to read the fun exchange.

Okay. So what exactly was prep on Friday night? Getting the vanity ready to paint.

First, I took off all the hardware.

Gray Oak Studio - 2 Days 200 Dollars - Prepping vanity for paint

Second, I cleaned all surfaces. I use a vinegar/water mix as my everyday cleaner (2 parts water, 1 part white vinegar).

Third, I primed the whole thing. I like using foam paint brushes on furniture that has lots of insets and curves. They get in the creases more easily.

Gray Oak Studio - 2 Days 200 Dollars - Prepping vanity for paint
Gray Oak Studio - 2 Days 200 Dollars - Prepping bathroom vanity for paint

And that was my wild and crazy Friday night. Well, one hour of my wild and crazy Friday night.

On Saturday, I started the day with a coat of paint on the vanity (Mysterious by Benjamin Moore).

Gray Oak Studio - 2 Days 200 Dollar Challenge - Painting Bathroom Vanity

Then shopping. I headed out to Lowes for a woven bamboo shade. I knew what I wanted - a cordless, bamboo shade in medium brown. But then I got to the store and for half a second I reconsidered the color. A lighter, blondish shade caught my eye.

The top shade is what I initially wanted, the bottom shade made me double think my choice.

Gray Oak Studio - 2 Days 200 Dollars Challenge - Window Treatment

But then I turned the boxes over…

 
Gray Oak Studio - 2 Days 200 Dollars Challenge - Window Treatment
 

And nope, I did not like the lighter shade. The contrast of the dark speckles felt too harsh. Not what we wanted. Out of curiosity I polled our Instagram followers to see what they thought. It was fun to see the results a day later - we’re all on the same page. Love it.

Gray Oak Studio - 2 Days 200 Dollars Challenge - Bamboo Shade
Gray Oak Studio - 2 Days 200 Dollars Challenge - Bamboo Shades

Back at home, it was time for those gross, old, vertical blinds to go. I’m proud to say that I installed the bamboo shade myself (it was super easy, I’m not that handy). And the change was instant and dramatic.

Gray Oak Studio - 2 Days 200 Dollars Challenge - Window Treatment Transformation
Gray Oak Studio - 2 Days 200 Dollars - Window Treatment Transformation

Next up, I put a second coat of paint on the vanity.

Then, my husband (who is that handy) changed the light fixture. Electrical work is officially beyond my pay grade, although I’m told (repeatedly) that changing a light fixture is really straight forward.

 
Gray Oak Studio - 2 Days 200 Dollars Challenge - Bathroom Vanity Light Fixture Update
 

I screwed in my favorite vintage LED bulbs (these guys) and Day 1 was complete. From start to finish, I put in about 4.5 hours of work (including the shopping!).

Here’s a sneak peak.

 
Gray Oak Studio - 2 Days 200 Dollars Challenge - Sneak Peak after Day 1
 

With all the major work done, Day 2 will be adding the new vanity hardware and shopping my house for frames, art and decor.

Stay Tuned!

- Leah

*This post contains affiliate links*

2 Days 200 Dollars Challenge - The Plan

We are serious fan girls of Cynthia Harper. She’s a stylist/influencer/social media guru guide (that’s an industry term…) and she recently launched a lifestyle website. We’ve been following her since foreva and earlier this year we had the pleasure of interviewing her on this blog. She shared so many pearls of home design wisdom, including the two genius questions you should ask yourself before buying any item for your home: “1) Are there are least 3 places in my home that I could put this? and 2) Would I still consider buying this if I had to pay twice as much for it?" So, so smart. Check out the full interview here.

When she announced a “2 Days 200 Dollars” challenge at the beginning of the month, we were immediately intrigued. The idea of her challenge is sort of self explanatory - taking 2 days and $200 dollars to transform a space (any space!). We’ve always wanted to join the One Room Challenge (more on what that is here) and thought this might be a nice way to ease ourselves into the room transformation challenge world. So, after a tiny bit of contemplation - we high fived, fist pumped and announced to each other: we’re in.

We decided to conquer a sad, sad bathroom. That happens to be mine. It’s a bathroom that hasn't been updated in several decades and needs a FULL gut renovation. But, that takes a lot of consideration (still honing in on what my dream bathroom looks like) and a lot of dough (big dreams = big budget). So, I’ve been in the never ending phase of dreaming and saving. I’ve also never been great (or interested) in designing intermittent spaces because, again, I dream big. Doing anything less feels frustrating.

In comes a little motivation from Cynthia Harper and my whole attitude changed. First, I love a good challenge. I’ve always been an adventurous “Truth or Dare” player. Second, the needed overhaul for this bathroom is still years away and I don’t know if I can bare brushing my teeth in the situation any longer. Third, 2 days and $200 is so low key that I knew I wouldn’t feel like I was spending an inordinate amount of time or money on a short term design. And just like that I was instantly ready to create a beautiful bandaid! Sometimes a little random, outside motivation is the perfect push.

Now, let’s get into the project. Here are some before photos.

 
Gray Oak Studio - 2 Days 200 Dollars Challenge - BEFORE photo
 

Feist your eyes on that orange-y stained oak vanity. And those blinds. They may legitimately blind you.

Gray Oak Studio - 2 Days 200 Dollars Challenge - BEFORE photo
Gray Oak Studio - 2 Days 200 Dollar Challenge - Day 1

Clearly there was nowhere to go but up - which is an awesome starting point for a transformation.

First thing’s first, we needed a big picture plan - what was I going to change…with only $200? Designing a quick, low cost refresh is a really different process than undertaking a full budget, thoughtfully paced design. You need high impact at minimal cost, which means some of the biggest pain points of the room will be left untouched. For example, the shower in this bathroom is a true nightmare. It’s a corner shower unit - a plastic, triangular stall with just barely enough room to swing the plexiglass door open/closed. It’s not ok.

With that being said, there was nothing I was going to be able to do to improve the shower with $200 or in 2 days. But there was plenty, as you can see, that I could tackle. The old, cracked tile floor. The orange-stained 1970’s vanity. The truly awful blinds. The warping, cheap mirror. The barely-hanging-on-the-wall-super-dated vanity lights. The framed art above the toilet that is too high because the art that was once below it came down a long time ago and I never adjusted the height. The list goes on. So, the question became, where to start?

For a quick, low cost refresh, how do you focus your efforts to get the best result?

Here is where we’re going to let you in on our little Gray Oak secret formula. The “high impact transformation” formula. We have many poorly named formulas around here. Our entryway formula (aka mirror + texture + storage) got a whole blog post to itself and we talked about our “areas of function” guide in our Pilgrim Project dining room and our Homestead Project living room.

But, back to the “high impact transformation” formula - there are 3 things in every room that create the biggest impact. These three things are what will instantly date a room. Or, instantly create both interest and polish.

You ready?

1. Window Treatments

2. Light Fixtures

3. Rugs

Say it with me: window treatments, light fixtures and rugs. These three elements create the design trinity of any and all rooms.

And so, as much as I hate the tile floor, I wasn’t going to address it. And the warping, cheap mirror will stay warped and cheap and on my wall (for now). Instead, we planned to spend almost my entire budget on the window treatment and the vanity lights. And whatever was left would go toward a bonus something.

With the big picture in mind, here is the moodboard we came up with:

Gray Oak Studio - 2 Days 200 Challenge Moodboard

And here’s the breakdown:

Wall Color - This will stay the same, it’s Silver Cloud by Benjamin Moore (pale gray/blue) and I like it!

Window Treatment - The blinds will be replaced with a woven bamboo shade. They’re semi-custom in that Lowes will cut them to size in store and they’re cordless (I have a thing with cords and kids, I don’t like them together). This guy will do miles bringing the entire room up to 2018 and it will add warmth and texture. One check for form and another for function.

Vanity - The vanity will be painted Mysterious by Benjamin Moore (I had some extra paint from another project). The deep, saturated blue/charcoal will bring interest by contrasting the existing cooler palette.

Vanity Hardware - The curvy, brass pulls will be replaced by more modern, nickel pulls.

Vanity Lights - This was tricky. The existing light fixture had a large backplate and once it was removed there were two issues. First, the wall behind the backplate was not painted and I didn’t have any touch up paint for Silver Cloud (and I didn’t have extra money in the budget to get some!). Second, the wiring for the light fixture was off center, which is just odd. We think the bathroom must have been updated at some point and the size of the light fixture was changed, but the wiring wasn’t properly reentered to the larger size fixture. Again, weird. {Design Tip: be sure to do legwork before buying replacement light fixtures. You never know what you’re gonna find!} All this meant, we needed to choose a light fixture with a backplate, which was limiting…but we did it.

Mirror - It is what it is. Whomp, whomp.

Decor - I won’t have any extra money to buy something new, so it’ll be a matter of shopping my house!

There’s the plan. You can catch up on Day 1 progress on Instagram highlights.

- Leah

*This post contains affiliate links*